Windows 7 Snipping Tool
Before Windows 7, the only built-in Windows graphics program was Paint. Now we have the aptly named ‘Snip which allows us to take screen shots and save the resulting image to a png, jpeg, gif or even an html file format. This is more versatile that Print Screen.
Topics for The Microsoft Snipping Tool
♦
Getting Started with ‘Snippy’
If you are moderately experienced then you can anticipate how to find and launch Windows 7’s Snipping Tool.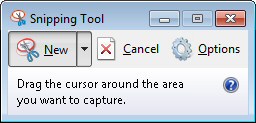
Method 1
Click on the Start Orb, In the Search dialog box type: Snip. The Snipping Tool appears in the Programs list. Double click to launch.
Method 2
Alternatively, you could take the traditional route:
Start Orb, All Programs, Accessories, Snipping Tool
Preparing for the ‘Snip’
Making a ‘Snip’ is intuitive. However, the very, first time you can wonder what to do. Just look for the big cross and drag with the mouse. The desktop will be a translucent / grey. This simultaneously alerts you to copy an area, and allows you enough transparency to see what you are doing.
Tip So That You Can Snip Menus
Mission to capture open menus and popups.
- Open the snipping tool, but press the Esc key to get out of snipping mode.
- Setup the screen to be captured
- Press Ctrl + Print Screen (Crucial Point)
- Now select the area of your screen that you want to capture. In truth, it took me about 7 goes before I got the sequence right.
- If all else fails call for the Windows 7 Snipping tool’s help!
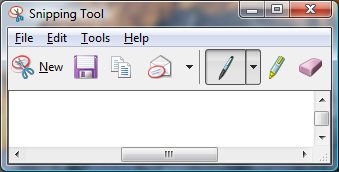
Update: Once you have made the ‘cut’, you can highlight areas with a thin pen or a thick marker. At first, I overlooked these snipping tools, both of which are found on the small toolbar, see screenshot.
Guy Recommends: SolarWinds Free Network Bandwidth Monitor

This freeware monitor is great for checking whether your network’s load-balancing is performing as expected, for example, are two interfaces are getting about equal traffic?
It’s easy to install and straightforward to configure. You will soon be running tests to see how much network bandwidth your applications consume.
The GUI has a lovely balance between immediate network traffic data in the middle, combined with buttons to seek related data and configuration settings. Give this monitor a try, it’s free!
Download your free network bandwidth monitor
If you need more comprehensive network analysis software:
Download a free trial of NPM (Network Performance Monitor)
Microsoft Snipping Tool Decisions
As with most Microsoft programs, somewhere there are configuration properties, or in this case, an Option menu. For example: Use Options to get rid of "Show screen overlay when Snipping Tool is active."
For me the key decisions were:
- Do you want the Snipping Tool pinned to the Taskbar or the Start Menu? If so, right-click the executable.
- Which format do you want to save your image? Jpeg, gif, png or html.
- (I also have a problem remembering the highlighting tools.)
Complimentary Graphics Tools
To take shots of the Snipping Tool itself I used Paint Shop Pro. In a word a professional graphics package provides sophistication. However, the advantages of the Windows 7 Snipping tool is that it’s built-in and the learning time is zero compared with two weeks for the average graphics package.
Just as many of the current computer generation are not aware of Ctrl +c for copy, so they are oblivious to the Print Screen key for capturing images. Unfortunately, neither of these techniques work with the Snipping tool, but they do work with Paint Shop Pro.
If you like this page then please share it with your friends