Installing DNS Zones in Windows Server 2003
Installing DNS is deceptive. A plan is essential and the time it takes to prepare a checklist will repay ten fold in saved frustration. What makes installing DNS difficult is that usually the goal is to install Active Directory and DNS is merely a stepping stone. The biggest challenge is managing all the places and all the settings which require names. There are times when it is best to trust the DNS wizard to configure the settings, this is particularly true for Active Directories _MSDCS records.
Tutorial for Installing DNS Zones in Windows Server 2003
- Preparing the DNS Server
- Installing the DNS Server Service
- Creating the Zones
- Installing Active Directory
- Summary
‡
Preparing the DNS Server
It is crucial to ‘ Get all your ducks in a row ‘. By that I mean match the names in System Icon, Computer Name (tab) with the namespace of your main DNS domain. for example guybay.com.
Decide if this DNS name (guybay.com) should match your Active Directory domain name, or whether you want sub-domain, for example ad.guybay.com. This decision is especially important where you are installing DNS / Active Directory on a domain controller in a ‘green field’ site. See here for the importance of DNS Naming.
I have assumed that you plan to install a forward lookup zone, but what about the reverse lookup zone? It only takes a minute to install the reverse lookup zone and without it utilities like DNSLint and NSLookup will not function.
A setting that is easy to overlook is the TCP/IP properties of the network icon. If you add our own DNS name to the ‘ Preferred DNS server ‘, then DNS will automatically add an A (Host) record for your own machine. One variation of this trap is to forget to add the Preferred DNS server to the second or third network card. Another variation is to forget to add other DNS servers to the list of DNS servers underneath the TCP/IP properties tab.
Installing the DNS Server Service
Remember that DNS is a service, ranking along side Alerter, SMTP, Print Spooler. First job, get your Windows 2003 Server CD ready. To install the DNS service navigate to Control Panel, Add or Remove Programs, Windows Components, Networking Services, tick the Domain Name System (DNS).
As soon as the installation completes I would create an MMC and add the DNS snap-in. More traditional administrators use the administrators’ folder or the Computer Management console. Once you launch the DNS snap-in, just right-click and add the server by name. Take the time to familiarize yourself with which settings are on which tabs of the Server Icon and also, which settings are found on the property sheets of the Forward and Reverse Lookup zones.
Creating the DNS Zones
Installing the DNS service is the easy part. Mechanically adding zones is straightforward, but your DNS server will only function correctly if you understand, then plan the fully qualified domain name. For example, what if any, extension will you for your Active Directory domain? guybay.org or yourcompany.com? ad.guybay.org? or plain guybay (no extension). These are hard questions with far reaching answers, moreover only you can decide.
Forward Lookup Zones 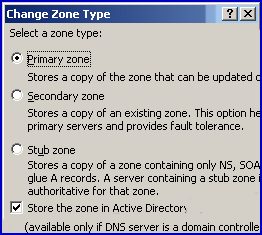
Normally, you would start by creating a forward lookup zone on your DNS server. right-click the Forward Lookup Zone yellow folder and select, New Zone. Here is where your planning will repay as you have to decide on a Primary, Secondary or possibly a Stub zone. Note the check box for – Store the zone in Active Directory.
In Windows Server 2003 you can decide to replicate the DNS information to all DC in the Forest, or just those in your domain. I would not worry too much about this as you can change your mind and move the radio button later.
Next comes the zone name, this is important to get right otherwise you have to delete your zone and start all over again. In my example I would type guybay.com. (Note I have decided to use the .com extension.)
I would allow secure and non secure dynamic updates. My thinking is let us give DNS the best chance of working. Once it works then I can start tightening up security. Now comes the magic moment when you press finish and see at least 3 records SOA, NS and Host (A) record.
Guy Recommends: A Free Trial of the Network Performance Monitor (NPM) v12
v12

SolarWinds’ Network Performance Monitor will help you discover what’s happening on your network. This utility will also guide you through troubleshooting; the dashboard will indicate whether the root cause is a broken link, faulty equipment or resource overload.
Perhaps the NPM’s best feature is the way it suggests solutions to network problems. Its second best feature is the ability to monitor the health of individual VMware virtual machines. If you are interested in troubleshooting, and creating network maps, then I recommend that you give this Network Performance Monitor a try.
Download your free trial of SolarWinds Network Performance Monitor.
Reverse Lookup Zones
Do take a minute to create a Reverse Lookup Zone. My reasoning is that if have the Reverse Lookup in-place from day one, then all the PTR (Pointer) records are created automatically. The alternative is that if you create the Reverse Lookup 6 months down the line then you have to add those PTR records manually. Why are you creating a Reverse Lookup Zone? So that NSLookup and DNSLint work properly.
The only planning here is to calculate your network IP. For example 10.1.0.1 Subnet mask 255.255.0.0 would mean an network ID of 10.1. Follow the simple action of typing in 10 then 1. (Do not go into ‘ over-think ‘ and type in 1 then 10. These days Windows works out the reverse numbers from your simple input.
Make sure that you have a PTR record for each NIC and IP address.
Stub Zones
Conceptually, stub zones are like secondary zones in that they have a read only copy of a primary zone. The two differences are Stub Zones have fewer records. Stub zones are more efficient and create less replication traffic.
Stub Zones only have 3 records, the SOA for the primary zone, NS record and a Host (A) record. The idea is that if a client queries a record in the Stub Zone, your DNS server can refer that query to the correct Name Server because it knows its Host (A) record.
My advice would be to use Stub Zones in situations where most of these are true:
- You have a large Active Directory Forest.
- You use Active Directory Integrated DNS.
- DNS is delegated and distributed throughout the Child Domains.
- Users in one domain often issue DNS queries to other domains
Installing Active Directory
Step one: you have the bare bones of DNS installed, for example just records for the first domain controller.
Step two: run DCPROMO. The secret is to let the DCPROMO wizard automatically add the (_SRV) records to DNS. My advice is never add these records manually. Occasionally, especially with Windows 2000 the (_SRV) records are not installed, the trick is to stop then start the Netlogon service and miraculously the records will be created. If that does not work, give up and start again, run DCPROMO to demote, reconfigure the System Icon, Computer (Tab) – try again.
Windows Server 2003 automatically creates a top level DNS Forward Lookup Zone called _MSDCS.your.dom. Previously, this was hidden away as a subzone under your.dom.
Summary of Installing DNS Zones
When you install DNS take the time to plan carefully. In particular decide which name to use and then configure this name at the System Icon, Computer (Tab). Let the DCPROMO wizard install the (_SRV) resource records. My tutorial will take you through installing the DNS Service, and then configuring the forward, reverse and stub zones.
If you like this page then please share it with your friends
Related DNS Server topics
- New Features for DNS in Windows Server 2003
- DNS – Names & Namespace
- Types of DNS Zone
- Conditional Forwarding
- Installing DNS Server
- DNS Queries
- Root Hints
- Resource Records
- DNS Naming Rules
- Basic DNS Server Troubleshooting
- Advanced DNS Troubleshooting
- Debug Logging for DNS in Windows Server 2003
- DNSLint – Utility