Introduction to AutoAdminLogon
This registry setting allow a user to automatically logon at any Windows network computer without giving a password. Clever installation scripts take advantage of AutoAdminLogon and so build the machines without an operator having to reboot. (Even Cleverer scripts tighten security by removing AutoAdminLogon when they have finished.)
See my Vista page on AutoAdminLogon
Topics for AutoAdminLogon
- Auto Logon in Windows 7
- AutoAdminLogon in Vista
- How AutoAdminLogon Works
- First Objective – Navigate to the Winlogon registry hive
- Second Objective – To set the AutoAdminLogon value =1
- Third Objective – Create DefaultPassword and set the password
- Windows 8 AutoAdminLogon
How AutoAdminLogon Works
Once AutoAdminLogon is turned on, the operating system reads the registry and attempts to logon the value specified by DefaultUserName. The key to AutoAdminLogon is setting the defaultpassword for that default user, then the machine loads the desktop without anyone pressing Ctrl Alt Delete.
As you can see AutoAdminLogon is not secure, but I confess to using it on my home machine. However, once I had a business use for AutoAdminLogon. The situation was a library wanted their computers to automatically reboot if there was a problem. They did want the librarian to have to leave their desk and press Ctrl Alt Delete.
See my latest page on AutoAdminLogon
Getting Started
The best executable to hack the registry is Regedit.exe. Go to the START (Button), RUN, REGEDIT (Type), OK (Button). The Windows 2003 version remembers the last place you visited which is useful if you use Regedit often.
If you are still not sure how to start Regedit,click here.
Goal to configure AutoAdminLogon
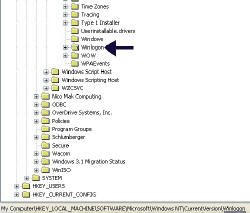
First Objective – Navigate to the Winlogon registry hive.
 Method 1) Run Regedit and go to the Edit menu, select ‘Find’ then type DefaultUserName. The purpose is to get to the correct place within the registry before you start configuring. N.B. You may have to press F3. You will have succeed when you see HKey_Local_Machine\Software\Microsoft\Windows NT\CurrentVersion\winlogon.
Method 2) If Method 1 fails then open Regedit and drill down to: HKey_Local_Machine\Software\Microsoft\Windows NT\CurrentVersion\winlogon.
Second Objective – To set the AutoadminLogon value =1
If AutoAdminLogon exists then Double Click on AutoAdminLogon and set value =1 (Numeric 1)
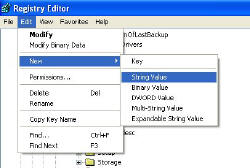
If AutoAdminLogon does NOT exist then go to: Edit (Menu), New, String Value, Type AutoAdminLogon
Third Objective – Create DefaultPassword and set the password
 In regedit, you need to go to the EDIT menu, New, String Value type DefaultPassword.
To get AutoAdminLogon to work you need to add DefaultPassword to the same WINLOGON area. Set the password to what ever it needs to be for the DefaultUserName to logon successfully.
Note 1: You do need a reboot to test AutoAdminLogon, one suggestion would be to master the shutdown /m \\ victim. See more here.
Note 2: The DefaultUserName does not have to be Administrator; in fact it is more secure if you set it to who ever is most appropriate.
Note 3: To break out of AutoAdminLogon and select a different username, keep your finger on the Shift key before logon.
Note 4: If want to see a sample .reg file featuring AutoAdminLogon see here.
Monitor Your Network with the Real-time Traffic Analyzer
The main reason to monitor your network is to check that your all your servers are available. If there is a network problem you want an interface to show the scope of the problem at a glance.
Even when all servers and routers are available, sooner or later you will be curious to know who, or what, is hogging your precious network’s bandwidth. A GUI showing the top 10 users makes interesting reading.
Another reason to monitor network traffic is to learn more about your server’s response times and the use of resources. To take the pain out of capturing frames and analysing the raw data, Guy recommends that you download a copy of the SolarWindsfree Real-time NetFlow Analyzer.
If you like this page then please share it with your friends
Windows Vista Registry Tweaks:
