Introduction to Exchange 2003 Global Settings, Message Delivery
The Global Settings folder is Microsoft Exchange 2003 server’s forgotten zone. This is the place to visit when you need to control Message Delivery. Microsoft provided Global Settings as a useful method for blocking incoming spam.
Topics for Exchange Server, Global Settings Message Delivery
- Global Settings Message Delivery
- Connection Filtering
- Recipient Filtering
- Sender Filtering
- Delivery Restrictions
- Summary
♠
Global Settings, Message Delivery
What you need is an overall plan for controlling unwanted email. Within this plan develop one strategy for anti-virus and another strategy for spam. For both strategies you are probably going to rely on third party suppliers. Make a start by visiting the Message Delivery folder, here is where you can improve the performance of your Exchange 2003 server by blocking spam.
To find the Message Delivery folder:
- Launch the Exchange System Manager.
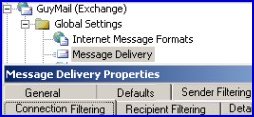
- Expand Global Settings and Message Delivery is the second folder. (See diagram.)
- Within Message Delivery you have 3 choices, Connection filtering, Sender filtering and Recipient filtering.
Connection Filtering
Here in Connection Filtering is where you configure blocklists or black lists. The idea is to ban specific SMTP servers from delivering email to your Exchange server. Guy’s advice: Connection Filtering is a great idea but it will only work if you get a good source of up-to-date blocklists. Let us face facts; there is a battle out there between the spammers and the spam slayers. The best solution is to hire an anti-spam mercenary who will supply us with the latest blocklist.
Danger. You get too carried away and block the good people. One answer would be to develop ‘white lists’ of people whose email will always get through. Check the Exception button.
If you you decide this is a must have feature, then you may wish to tune the message under Custom Error Message to Return. The default message is:
<IP address> has been blocked by <Connection Filter Rule Name>
What you can do is add the following %variables to create a custom message:
%0 Connecting IP address
%1 Name of connection filter rule
%2 The block list provider
Guy Recommends: Permissions Analyzer – Free Active Directory Tool
I like thePermissions Monitor because it enables me to see quickly WHO has permissions to do WHAT. When you launch this tool it analyzes a users effective NTFS permissions for a specific file or folder, takes into account network share access, then displays the results in a nifty desktop dashboard!
Think of all the frustration that this free utility saves when you are troubleshooting authorization problems for users access to a resource. Give this permissions monitor a try – it’s free!
Download Permissions Analyser – Free Active Directory Tool
Recipient Filtering
Once you understand the concept, recipient filtering is one of the easiest settings to manage. Spammers always try sending email to a few obvious accounts, I get email for root@ or sales@ computerperformance.co.uk. My point is that if you get stacks of mail for non-existent accounts, then simply block them and bounce the spam.
Sender Filtering
Schools and other sensitive organizations may wish to prevent certain accounts from ever sending out email.
N.B. Trap. You configure message filtering, but nothing happens. Until you configure the Virtual Server, all your message filtering is in vain. What you should do is expand the Exchange System Manager, drill down through Server, Protocols, SMTP until you reach Virtual Server. Now find the Advanced Tab, IP address and check the Apply Filter box.
This knowledge may plant an idea. Why not create multiple Virtual servers for Sender Filtering? What I am thinking is this, let most people send email through the default Virtual Server, but create a second Virtual server which you apply different rules for sending. Route all accounts that you wish to block via that second Virtual server. See more on Virtual Servers.
This knowledge may plant an idea to create multiple Virtual servers, particularly for Sender Filtering. What I am thinking is this, let most people send email through the default Virtual Server, but create a second Virtual server which Apply the sender filter. Route all the blocked accounts via that second Virtual server.
Delivery Restrictions – Default Tab
Remember that these are Global settings so they effect your entire Exchange 2003 Organization. If you need to universally restrict either incoming or outgoing messages then the Delivery Restrictions menu is the place to set limits.
Guy’s advice – look to routing connectors for alternatives to delivery restrictions.
I am not a great fan of setting delivery restriction in the Global Settings folder. Instead, I would configure message limits on the SMTP or Routing Group connectors. Another tactic would be to compromise, allow large outgoing emails, but only at off peak times.
Guy Recommends: A Free Trial of the Network Performance Monitor (NPM) v11.5
v11.5
SolarWinds’ Network Performance Monitor will help you discover what’s happening on your network. This utility will also guide you through troubleshooting; the dashboard will indicate whether the root cause is a broken link, faulty equipment or resource overload.
What I like best is the way NPM suggests solutions to network problems. Its also has the ability to monitor the health of individual VMware virtual machines. If you are interested in troubleshooting, and creating network maps, then I recommend that you try NPM now.
Download a free trial of SolarWinds’ Network Performance Monitor
Summary of Exchange 2003 – Global Settings, Message Delivery
It’s well worth checking your options in the Global Settings folder. So open your Microsoft Exchange System Manager and explore the top folder. Remember that with message filtering, you must apply the settings to each Virtual server.
If you like this page then please share it with your friends


