Installing Vista Beta 2 (Build 5456) on Virtual PC

In terms of names, what Microsoft referred to as Vista Beta 2 was build 5384. Build 5456 is an improved version of Beta 2 that fixes the bugs discovered in 5384. One further point, Microsoft say that Build 5456 will be the first version that can be upgraded to Windows Vista RC1 (Release Candidate).
Please note: here is an update featuring Windows Virtual PC 2007 SP1
Whether you have build 5384, 5456 or 5472, I now recommend you switch to this page Vista Beta 2 Build 5472. I also have instructions for older Vista builds, they are probably obsolete, but just in case that is the only version you have, here are the references: 5308,5270 and 5112.
When you decide to install Windows Vista Beta 2 on a Virtual Machine, don’t be in a hurry. Have a good book to read or a T.V. program to watch. The install takes 40 minutes and while there are long intervals where no human input is required, the whole procedure slows up the host machine.
Introduction to Installing Windows Vista on Virtual PC 2004
From the outset, I believed that it would be possible to install Vista Build 5456 on Microsoft’s Virtual PC 2004**. My background is that I have installed about twenty virtual machines before I installed Vista Build 5456. I choose to install Virtual PC 2004 on Windows Server 2003, even though the setup says explicitly that this host operating system is not recommended. The reason that I mention these two facts is to give you confidence; to emphasise that while I am no great expert on Virtual PC, yet I got Vista working. I would also like to report that installing Vista on Virtual PC gets easier with each successive build number.
**The latest version of Virtual PC is 2005. While it looks flashy, has more features, I just cannot get along with version 2005, principally because it drives me mad; every time I do anything it asks for my username and password.
For experienced techies, who are geniuses at computing, all you need to do is absorb these key concepts:
- Download an Image from connect.microsoft, or order Vista Beta 2 free from CPP (Consumer Preview Program), you get a DVD to install Build 5438 on your own computer. The final alternative is via a TechNet or MSDN subscription.
- Create a new Virtual Machine with Virtual PC.
- Capture the image of the Vista Beta 2 in the Virtual Machine.
- Patience and faith that the Vista Build 5456 install will work.
For ordinary mortals, I will provide step-by-step instructions to help you install your Vista Beta 2 on Virtual PC.
Topics for Installing Vista Build 5456 on Virtual PC 2004
- First Goal – Get a Copy of the Vista Build
- Second Goal – Create a Simple Microsoft Virtual PC
- Third Goal – Capture the CD – Use Physical Drive
- Fourth Goal – Create a Partition for the Vista Install
- Post Installation Essential Tasks and Troubleshooting
First Goal – Get a Copy of the Windows Vista Build
Perhaps the best way to get a copy of the Windows Vista Beta (and later RC1) is from the Vista Beta CPP scheme.
One of Microsoft’s satellite companies called Connect deals with Beta downloads. You can find them at connect.microsoft.com. The reason that I am vague about how I got started with Connect is purely bad memory. I cannot be sure whether it was a bonus of being an MCT, MVP or whether I just saw the site and applied to trial Microsoft’s Beta software.
What I do remember is getting stuck when I first joined, I could never seem to find the downloads, then I could not find the product keys – most frustrating. My message is this, once you have been accepted into the Vista Beta Program, search and you will find everything that you need there on the Connect site – somewhere. Incidentally, I also applied for the Exchange 2007 (E12) Beta, and after a few days received links to download that DVD ISO image, thus getting an account with Connect will be useful in the future, for example with Longhorn.
The Actual Vista 5456 image
At this point, we need to download the Vista Build 5456 image; not a trivial task as there are a bewildering number of variations. The only trap is to make sure you have the appropriate version for your x86 or x64 processor. Once I made my selection, the Connect site supplied me with a single file, which was a DVD image in ISO format. Incidentally, I applaud Microsoft on their download engine – File Transfer Manager, this software is intelligent and continues where you left off should the internet connection time-out and you have to reconnect. As I mentioned earlier, build 5438 is available on DVD, which is much more convenient for the install.
Second Goal – Create a Simple Microsoft Virtual PC
My advice is keep the New Virtual PC setup as simple as possible, just follow the defaults, the one exception is increase the 512 Ram memory for your Vista Virtual Machine to 1GB. By all means adjust the settings once you have created the machine and installed the operating system.
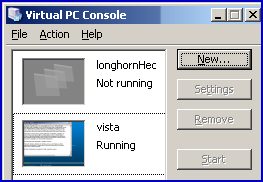
- From the Virtual PC Console, click New…
- Create a virtual machine.
- Choose a location with at least 16 GB of free space.
- Operating System, Other or Windows Server 2003 it doesn’t matter.
- Adjusting Ram – 512 MB Ram is recommended, I choose 1,000 MB.
- A new virtual hard disk.
- Name and Location. Previously, I created a special partition for VM images..
- Finish.
Third Goal – Capture the CD – Use Physical Drive

The situation so far, we have obtained the ISO DVD image, now we want to boot the Virtual Machine, not from the physical CD, but from the bootable ISO image. It is always worth reading the Release Notes and in this instance the gem in the document was that there would be an upgrade path from Beta 2 to Vista RC1 (Release Candidate).
There is problem with downloading Vista builds starting with 5308 and including 5456. These build is over the 2.2 GB DVD limit that Virtual Machine 2004 understands. (Build 5270 was under 2.2 GB). Solution, I invested $48 in Nero 7 ImageDrive, what Nero 7 does is make the ISO image appear as a Physical drive, as a result you can by-pass the ‘Capture ISO Image which has the 2.2 GB limit.
What ImageDrive did for me was capture the vista_5456.5.060620-1700_winmain_idx03_x86fre_client-LB2CFRE_EN_DVD.iso to the I: drive. (Your drive letter is likely to be E: F: or G:)
What we do in the Virtual PC console, is click on the top menu called ‘CD’ and select – Use Physical Drive I: (See screen shot, bearing in mind that your drive letter will be different).
.
Fourth Goal – Create a Partition and Install Vista

I was thrilled that the Virtual CD was able to boot from the image captured on my I: drive. The first few menus were straightforward, the only slight hiccup was the CD Key, I requested a ‘5342 and Up Ultimate Keys’ and they worked on my 5456 build. I guess the key phrase is ‘and Up’.
Earlier versions gave me enormous frustration when Windows Install asked the question ‘Where do you want to install Windows’, however Build 5456 handled creating the virtual disk smoothly. (Problems with Build 5308)
Once I agreed to the licence menu, the install continued copying files, expanding, installing features, I came back 30 minutes later and Windows Install had completed successfully.
At the end of the install Vista asks you to set the Region and Time Zone. Another bonus was that Vista Beta recognised the United Kingdom keyboard layout.
In terms of efficiency and intelligence, Vista has Microsoft’s best install to date. For example, XP installs are a pain in that the halt after about 10 minutes and ask you to input networking information. Vista had no such interruption, moreover it appeared to automatically detect the network and give it self, not an APIPA, but a suitable IP address for the subnet where I installed e.g. 192.168.0.10. This was not magic, it picked up the IP address either from and XP machine with Internet Sharing or the traditional DHCP server.
Post Installation Tasks and Troubleshooting

A new development is the need to create the administrator’s account, Microsoft no longer create an administrator by default.
When the the earlier Vista builds finished installing, I was disappointed. In 5308, the 256 color resolution meant an atrocious display of any graphics moreover, the machine ran unacceptably slowly – even for Beta software. Then I remembered the Virtual Machine Additions. In a nutshell installing this add-on transformed my Vista 5308 experience.
With build 5456 I learnt from this experience and attempted to add the Virtual Machine Additions even before I started the install. I was slightly surprised that the Virtual PC kept asking me to install the Virtual Machine Additions.
To install the Virtual Machine Additions – again, I launched the Virtual PC console and clicked the ‘Action’ Menu and selected, ‘Install the Virtual Machine Additions’. It seemed to install very quickly – too quickly. To cut a long story short, this procedure was useless, the machine kept prompting me to install the Virtual Machine Additions. Finally, I went for the throat and drilled to D:\windows\ and double clicked setup. From here the Setup InstallShield Wizard appeared, took its time, but installed the Virtual Machine Additions properly.
What lulled me was the fact that build 5456 had good graphics from the start and silly me thought the slow performance was down to a checked beta version, the reality was the slow performance was down to lack of Virtual Machine Additions.
I found that the best setting for Network Adapter1 was to select the host NIC. In particular, this configuration cured a specific problem: Virtual PC could not open the Virtual Machine Network Services driver, or The Virtual Machine Network Services driver has failed to install.
My machine was fortunate in having 2 GB of Ram, so I allocated 1 GB to Vista. The problem was the Virtual PC Console would not let me use more than 300 MB. The error was: The virtual machine could not be started because there was not enough memory available on the host.
The true problem was interference from other programs, in my case Nero CD burner, in another case SQL. Therefore, try judicious zapping images in Task manager until you find the root cause, I say again, take care ending processes. The safe way would be to remove programs via the Add or Remove Programs.
Footnote
The above problem did not occur with build 5456 (only 5270). I credit Microsoft for ironing out that behaviour, however, it could have been the fact that I upgraded from Nero 6 to Nero 7.
![]() Once you have installed Vista in your virtual machine, access it via Remote Desktop.
Once you have installed Vista in your virtual machine, access it via Remote Desktop.
Summary of Installing Windows Vista in a Virtual PC
Obtain your copy of Windows Vista by either downloading an Image from connect.microsoft, or on DVD from CPP (Consumer Preview Program). Launch the Virtual Machine console to create a new Virtual disk / image / machine. Capture the image from the CD menu. The actual installation takes about half an hour, but the menus are straightforward, even easy if you have experience from installing XP.
See Also
• Vista Home • How to Create Virtual Folders • Explorer Features