Windows Vista Explorer – Layout Options
I spent half a morning just playing with the new Layout options for Vista’s Explorer. Learning when you are not in a hurry is a joy. What I want to do is explain the various Explorer Layout settings, and then urge you to experiment for yourself. Our mission is to spend eight minutes configuring Explorer’s Panes, as a result you will save time finding your files.
Topics for Vista Explorer Layout
- Explorer –> Organize –> Layout
- Apply to folders – Options
- Customize a New Folder
- Computer Truisms – Applied to Vista
- Windows 8 Ribbon
♦
Explorer –> Organize –> Layout

Once you have launched the Windows Explorer, home-in on the Organize menu, with its drop-down box.
The main point to note is that there are four Explorer layouts, and you can select more than one option. A particular problem that puzzled me was how to get a layout without a Preview Pane; then I realized all I had to do was click on Preview Pane, and this toggled-off the setting. Simple when you know how, fun when you have the time to experiment.
- Menu Bar – Displays File, Edit at the top. (Note the only option with a tick)
- Details Pane – Look at the bottom of your screen. (Note how icons change)
- Preview Pane – Specialist use for text files.
- Navigation Pane – I like the ‘Tree’ layout.

Observe in the above screenshot, how Explorer displays a faint blue border around the Preview Pane and the Navigation Pane options. Keeping your eye on the visual clues will help you interpret the behavior of the Layout options. In fact, studying the icons themselves will also explain what to expect if you select a particular layout, for example, why extra information appears at the very bottom when you select the Details Pane.
A question for you, if you scroll to the top of this page and examine the small screenshot, which of the four Layout options is NOT selected?
Answer: the Preview Pane.
Guy Recommends : SolarWinds’ Free VM Monitor

The best feature of this new this new version of SolarWinds VM Monitor is that it checks Windows Hyper-V. Naturally, it still works with virtual machines on VMware ESX Servers. VM Monitor is a clever desktop tool that not only tests that your server is online, but also displays the CPU and memory utilization for each node.
It’s easy to install and to configure this virtual machine monitor, all you need the host server’s IP address or hostname and the logon info. Give this virtual machine monitor a try – it’s free.
Download your free copy of SolarWinds VM Monitor.
Apply to folders – Options

When folder settings that you apply in one place don’t then appear in a similar situation, the result is confusion, and not a little frustration. If you set the ‘View’ to display ‘Details’ then you expect it to apply to all folders of that type.
The secret of success is to realize that it’s a two stage process. Firstly we will select the columns that we want, such as ‘Date modified,’ secondly we will ‘Apply to Folders’.
This is one of those tasks that is a knack. And as such is easy when you have the knack, but frustrating as you are learning what to do. Here are my step-by-step instructions:
0) Open Windows Vista Explorer
1) Display the File Edit View Tools menu. Either press just the Alt key, or else click, Organize, Layout and Menu Bar.
2a) Just so that you get the correct Title bar, from the Views menu, select List (or Details).
2b) At this point our mission is to display the appropriate columns. Success hinges on precisely where you right-click.
i) Try right-clicking just to the right of the word ‘Name’.
See screenshot to the right.
ii) Click so that a tick appears next to the column you want
2c) As a variation on this method, you can display an extra column, for example Authors. To achieve this:
i) Right-click in on the Menu bar which begins Name, Date Modified
ii) Select More…
iii) Add and extra column such as ‘Authors’.
We have now achieved the first goal, to set the Explorer columns to our liking; the next goal is to make sure that this View applies to all folders of the same type.
3) From the Tools menu, click Folder Options.
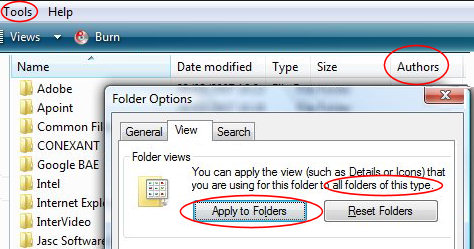
4) For once, let us be conscientious and read the menus extra carefully. What it says is that when you click ‘Apply to Folders, it applies the view to all folders OF THIS TYPE. Not understanding the phrase ‘of this type’ is what causes confusion. For example, when you Apply to Folders of the Document type, then browse the Contacts folder, it is frustrating when none of your new settings are there. The reason is because Contacts is a different TYPE of folder from Documents. One solution is to visit each type of folder and click on Apply to Folders in each type of folder.
5) Now go to a different folder of the same type, observe the layout, do the files display in the List (or Details) format that you selected in point 2?
Guy Recommends: A Free Trial of the Network Performance Monitor (NPM) v11.5
v11.5

SolarWinds’ Orion performance monitor will help you discover what’s happening on your network. This utility will also guide you through troubleshooting; the dashboard will indicate whether the root cause is a broken link, faulty equipment or resource overload.
What I like best is the way NPM suggests solutions to network problems. Its also has the ability to monitor the health of individual VMware virtual machines. If you are interested in troubleshooting, and creating network maps, then I recommend that you try NPM now.
Download a free trial of Solarwinds’ Network Performance Monitor
Customize a New Folder

This task is related to ‘Apply to Folder’, but the difference is we will now focus on how to create and customize a new folder.
- Create a new folder in Vista Explorer.
- Right-click that new folder
- Click on the Customize Tab
- Drop-down the:
‘Use this folder type as a template:’ - Choose the folder type, for example:
Music Details. - Optionally, change the folder icon.
Click Change Icon and make your selection.
Rumour has it that the Vista operating system optimizes the file performance dependent on the template that you select. Quite how much difference this makes, I have not tested, but my guess it that the improvement will be greatest for large Video files.
Computer Truisms – Applied to Vista
All the truisms are here: the more options, the more chance of getting lost. There are so many settings that you cannot possibly remember where they are. When it comes to finding or manipulating files Vista brings lots of tiny improvement on XP’s settings. To my thinking merely recreating what you had in XP is defeat. I disapprove of that ‘dinosaur’ strategy, and strongly encourage you to learn, have fun and become even more productive.
One of the best, and certainly one of the oldest computer aphorisms is – read your screen, and read that menu. A new new twist in Vista is also look for visual clues, different colors and meaningful icons.
Summary of Vista Explorer Layout Options
Save time and frustration by examining and experimenting with the Explorer Layout options. There are so many options and combinations that you are bound to find a layout to suit your working style. The frustration and confusion arises because there are different types of folders, for example Documents and Contacts. Crucially, you need to Apply to Folders for each type of folder.
If you like this page then please share it with your friends
Configuring Windows Vista Topics:
| Vista Tools and Extras
|
Download Your Tweak the Registry Ebook for only $6.45 This ebook will explain the workings of the registry. I thoroughly enjoy tweaking the registry, and I want to distill the best of my experiences and pass them on to you. Each registry tweak has two aims; to solve a specific problem, and to provide general learning points, which help you to master regedit. Over 60 pages ebook and PDF format
| |
