Installing Windows Vista Beta 1 on Virtual PC 2004 (Build 5112)
For experienced techies who are geniuses at computing, all you need to do is absorb these two concepts;
1) Convert the downloaded CD-Rom image into a Virtual CD, which Virtual PC can read.
2) Interrupt Vista’s setup with Shift F10, then create a partition with DiskPart.
My speciality is helping those who are new to the technologies. To achieve this goal, I will provide step-by-step instructions to get Vista Beta 1 working on Virtual PC 2004. I also have instructions for later Vista builds, here are the references: 5456 (Beta 2), 5308,and5270.
Topics for Installing Installing Vista Build 5112 on Virtual PC 2004
- Introduction to Installing Vista on Virtual PC 2004
- First Goal – Create a Simple Virtual PC
- Second Goal – Capture the CD – Use Physical Drive
- (Virtual CD-ROM Control Panel)
- Third Goal – Create a Partition for the Vista Install
- Fourth Goal – Install Vista Beta from Microsoft’s Image
- Post Installation Tasks and Troubleshooting
Introduction to Installing Vista on Virtual PC 2004
From the outset I had faith that it is possible to install Vista Build 5112 on Microsoft’s Virtual PC 2004. My background is that I have installed about 5 virtual machines before I installed Vista Beta 1. I choose to install Virtual PC 2004 on Windows Server 2003, even though the setup explicitly says this is not recommended. The reason that I mention these two fact to give you confidence; to emphasise that while I am no great expert on Virtual PC, yet I got Vista working.
My first attempt ended with me falling flat on my face. I just used the normal Virtual PC methods to install a guest operating system, Vista just would not recognise the Virtual Disk. Here is what I did to successfully install Vista Beta 1 on Virtual PC 2004.
In terms of strategy, either note the four goals and then just follow your nose, or follow the step-by-step instructions, allowing for slight variations between your system and mine.
First Goal – Create a Simple Virtual PC
The key point is keep the New Virtual PC simple, just follow the defaults (except select more Ram):
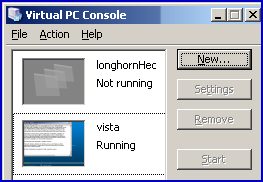
- From the Virtual PC Console, click New…
- Create a virtual machine.
- Choose a location with at least 16 GB of free space.
- Operating System, Other or Windows Server 2003 doesn’t matter.
- Adjusting Ram – 512 MB Ram is recommended. (See troubleshooting)
- A new virtual hard disk.
- Name and Location. Select default.
- Finish.
Second Goal – Capture the CD – Use Physical Drive…
Here is the problem, the size of the Vista CD image that I downloaded from Microsoft. Specifically, its size is 10% too big for Virtual PC 2004 to recognise. Therefore, if you have easy access to a program which will transform the Vista Beta 1 image onto a physical Bootable DVD, then your CD problems are over. However, if you decide to create a Virtual CD drive, then your install will be doubly difficult, but not impossible.
I wasted big bucks on Virtual CD software. It was a lovely product, but it did not get this Vista job done. What I got was: GLOBALROOT\Device\Harddisk0\Partition1\bootmgr is missing. So I researched a product called – Virtual CD-ROM Control Panel. This program exists in that twilight world where Microsoft point you towards it but don’t fully support it. Don’t worry about its history, it will do the job.
Virtual CD-ROM Control Panel
What finally helped me Capture CD, was a free program with a long strange name: ‘Virtual CD-ROM Control Panel v2.0.1.1’. Yes, Control Panel is part of its name. I won’t want to digress too much, just to say install Virtual CD-ROM Control Panel, add drivers, add drive, then mount drive with monster: lh_usa_5112.050720-1600_x86fre_pro-dvd file. If all else fails check its readme file.
At this stage I had a new Z: drive. In that Virtual drive was the Vista Beta 1 DVD image that I previously downloaded from Microsoft. What is more, the Virtual CD now showed up perfectly in the Virtual PC 2004 Console (I repeat, Virtual PC Console).
Here is where you can download Virtual CD-ROM Control Panel
Guy Recommends : SolarWinds’ Free VM Monitor
The best feature of this new this new version of SolarWinds VM Monitor is that it checks Windows Hyper-V. Naturally, it still works with virtual machines on VMware ESX Servers. VM Monitor is a clever desktop tool that not only tests that your server is online, but also displays the CPU and memory utilization for each node.
It’s easy to install and to configure this virtual machine monitor, all you need the host server’s IP address or hostname and the logon info. Give this virtual machine monitor a try – it’s free.
Download your free copy of SolarWinds VM Monitor.
Third Goal – Create a Partition for the Vista Install
My problem was that Virtual PC 2004 would not create a partition, so I needed outside help from either FDISK or DiskPart. My advice is to use which ever you are most comfortable with. FDISk requires a Window 98 start up disk, or similar 3rd part product. If you go for DiskPart, then you may wish to refresh your mind of its syntax and rational. Brian R, found he could create a partition using the actual Vista install.
Three ways to create the partition (You only need one!)
Plan A) Create a Partition with DiskPart
Plan B) Create a Partition with FDISK
Plan C) Let Virtual PC do the Formatting
Plan A) Create a Partition with DiskPart
The tactic explained in my Second Goal is to capture the CD, real or Virtual. Once the Vista CD boots, the first stage is to get to the cmd prompt – Press Shift F10. Once at the X: cmd prompt the plan is to employ DiskPart, to create Partition 1, Volume 1 and then format the one and only drive as NTFS. Here are step-by-step instructions.
- Seek the Virtual PC top menu. Click on CD and select ‘Use Physical Drive xyz’ Experiment with what ever letters it offers you.
- If necessary, press Right Alt + Delete to restart the Virtual Machine
- Once Vista’s Install boots, you have 3 Choices, select the top one, Install, but press Shift + F10 (Hold down both keys together.)
- Type: Diskpart. The key DiskPart commands are: Select then Create
- Select Disk 0 (zero not letter o and not 1)
- Create Partition Primary (Type those three words in the correct order)
- Format FS=NTFS (No drive letter necessary)
- Exit and quit the dos interface.
- Important: Restart the Virtual Machine
Plan B) Create a Partition with FDISK
- Put a Windows 98 Boot disk in the floppy drive. Or use a Bootable CD with FDISK.
- In the Virtual PC Console, select the new virtual machine you created in the First Goal and then click Start.
- When the Virtual machine boots, be sure that you are dealing with Virtual PC 2004 and not your host machine. This is critical because FDISK always makes me nervous.
- At the A: prompt type: FDISK
- You may have to press y once or twice to enable large disk.
- Note at anytime press Right Alt and Delete to reboot the virtual machine.
- In FDISK
- Press 1 – Create Dos Partition
- Press 1 (Again) – Create PRIMARY Dos Partition
- Some say you should now format the new partition, my view is formatting is pointless, as Vista will format as NTFS rather than FAT.
Plan C) Let Virtual PC do the Formatting
I saw your article on Vista and Virtual PC and found a way to not have to use a disk partitioning tool. When I got to the drive selection interface, all I had to do was select ‘New’, which then prompted for a size to setup. I set the maximum and then selected ‘Format’. The Virtual PC thrashed the disk a little and then the partition showed as formatted. All I had to do was exit the install and restart and it accepted the drive as is. No need to setup with FDISK, Win98 boot disk, or anything else. (Brian R)
Fourth Goal – Install Vista Beta from Microsoft’s Image
- If you have a shiny metal Vista Beta 1 CD, then put it in the caddy. (Remove the Win98 Floppy) Alternatively use a Virtual CD such as ‘Virtual CD-ROM Control Panel v2.0.1.1’
- Press the Right Alt and Delete keys to reboot the virtual machine.
- If necessary, try again to: Capture the CD from the Virtual CD Console.
- Vista begins it’s install.
- You enter the CD Key from the site where you got your Vista Beta 1. (I was lucky the key was the same as my Vista Beta 1.)
- Now you get to the crucial menu. Vista should see the Virtual Disk
- If you see the word ‘free’ in the orange strip (below), all is well. However, if you see the word unavailable then go back and create a partition with FDISK or DiskPart.

The Vista Beta install proceeds, it lies when it says 15-20 minutes, it took me more like 50 minutes complete the Vista installation.
Post Installation Tasks and Troubleshooting
Once Vista Build 5112 finishes installing, remember to add the Virtual Machine Additions. It is important to have the Vista Virtual Machine running, then select the Action menu the top Virtual PC 2004 console.
I found that the best Networking, Network Adapter 1 setting was to select the host NIC. In particular this configuration cured the problem: Virtual PC could not open the Virtual Machine Network Services driver, or The Virtual Machine Network Services driver has failed to install.
My machine was fortunate to have 2 GB of Ram, so I allocated 1 GB to Vista. The problem was the Virtual PC Console would not let me use more than 300 MB. The error was: The virtual machine could not be started because there was not enough memory available on the host.
The true problem was interference from other programs, in my case Nero CD burner, in another case SQL. So try judicious zapping images in Task manager until you find the root cause, I say again take care ending processes. The safe way would be to remove programs via the Add or Remove Programs.
See Also
• Vista Home • Aero Graphics • How to Create Virtual Folders • UAC