Windows Server 2003 – ADModify Support Tool Utility
ADModify is one of the most exciting tools in the Windows Server 2003 toolkit. Here is a step-by-step tutorial for getting started with Microsoft’s ADModify. What I particularly enjoy about this utility is the way that it combines the business of making bulk changes to Active Directory settings with the pleasure of navigating a friendly interface.
Topics for ADModify
- Introduction to ADModify
- Reasons for Using ADModify
- Example of ADModify to Change ‘Name’ Order
- Free Download of ADModify
- Admodcmd.exe Command Line Version
- Summary of ADModify
‡
Introduction to the ADModify Tool
With any new utility I always ask, where does this tool originate? In the case of ADModify, the answer is Microsoft’s lesser known arm PSS (Product Support Services), the operate from the Codeplex website. These PSS utilities come with a disclaimer that says beware use them at your own risk. Far from putting me off, the disclaimer just makes me realize how much testing has to go into an official Microsoft tool.
In July 2007 version 2.1 was released, it’s principle advantage is that version 2.1 is designed to work with .NET version 2.0.
Reasons for Using ADModify
I want to guide you through one ‘killer’ example of ADModify in action. Both the Exchange 2003 Address book (GAL) and Active Directory Users and Computers display the ‘Name’ column as First Name Last Name. I actually like that sequence because it’s friendly, and translates to, Tom Cruise, Britney Spears or Guy Thomas. However, most big businesses and many of my customers want to display: Last Name, Firstname, therefore they wish to see Cruise, Tom or Spears, Britney.
As an alternative to ADModify, you can use ADSI Edit to alter the createDialog attribute in Active Directory, but unfortunately this change only alters future user accounts, and as a result you could get confusion where half the users display First Name Last Name, and the other half the reverse (Last Name First Name).
So, here is the ‘killer’ application of ADModify, to change the display of all existing users (in ADUC and the GAL) to Last Name First Name. Perhaps you are wondering, ‘What about new users? Will their names display with the new settings?’ Good news. The answer is, ‘yes’ with ADModify. On reflection, it would be silly if it did NOT change new names, but there again you never know what happens until you test.
Guy Recommends 3 Free Active Directory Tools

SolarWinds have produced three Active Directory add-ons. These free utilities have been approved by Microsoft, and will help to manage your domain by:
- Seeking and zapping unwanted user accounts.
- Finding inactive computers.
- Bulk-importing new users. Give this AD utility a try, it’s free!
Download your FREE Active Directory administration tools.
Example of ADModify to Change ‘Name’ Order
Stage 0
If need to download ADModify before you tackle my step-by-step instructions see here.
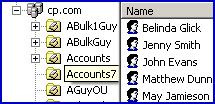
Before you launch the ADModify wizard, check Active Directory Users and Computers and note how the user names are displayed in the first column.

Stage 1
Launch ADModify.
Select ‘Modify Attributes’.
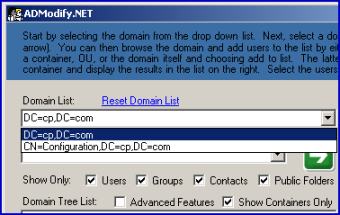
Click on the drop down menus to select your domain. See diagram on the right.
Optionally, Select a Domain Controller.
Decide if you want to show all objects, or just Users. If in doubt, go for consistency and leave all objects ticked.
Click on the large green arrow.
Stage 2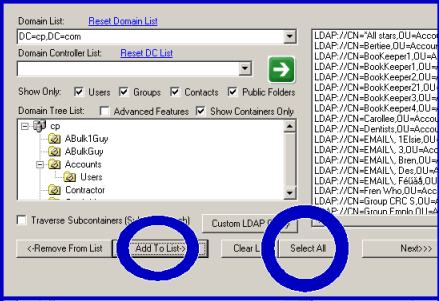
It is important to maximise the ADModify Window.
For your first try, select a test OU, just in case something goes wrong.
Be careful, you need the correct sequence here, click Add to List.
Now you are ready to Select All.
Click on the small Next>>> button.
Stage 3
Scroll down to the bottom of the page.
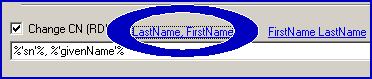
Tick the box: Display Name.
Remember your goal and click LastName, FirstName.
Note the syntax, especially the percentage signs and the comma.

Decide if you want to keep the comma. (Most people prefer the comma)
Stage 4
If the test OU worked as expected, and the ‘Name’ column is now sorted by LastName and not FirstName, then you could run ADModify again, but this time leave the focus at the domain level when you Select All.
 Guy Recommends: The Free Config Generator

SolarWinds’ Config Generator is a free tool, which puts you in charge of controlling changes to network routers and other SNMP devices. Boost your network performance by activating network device features you’ve already paid for.
Guy says that for newbies the biggest benefit of this free tool is that it will provide the impetus for you to learn more about configuring the SNMP service with its ‘Traps’ and ‘Communities’. Try Config Generator now – it’s free!
Download your free copy of Config Generator
Where Next with ADModify?
If you run ADModify again, then select other LDAP attributes that you see on the Active Directory Users and Computer Properties sheets. For example you could add a digit to the telephone number, change the manager or place the users in a different department.
More good news ADModify can easily undo previous changes, all you need is to preserve the XML files that ADModify creates automatically on each run.
Download ADModify
Free Download of ADModify v 2.1
I thank Johan Ramestam for pointing me to this latest version which works much better with .NET 2.0.
I thank Chris Hatcher for pointing out: Stage 3 Tick the box: Display Name. (and not Change CN (RDN))
Admodcmd.exe Command Line Version
For those die-hards there is a command-line version of ADModify called Admodcmd. Check the syntax by appending the question mark admodcmd -?
Examples for Admodcmd:
Modify the display name to read last name, first name:
admodcmd -dn OU=MyOU,DC=domain,DC=com -custom displayName "%’sn’%, %’givenName’%"
Add a secondary SMTP address of [email protected]:
admodcmd -dn OU=MyOU,DC=domain,DC=com -addsmtp %1’givenName’%.%’sn’%@cp.com
Summary of ADModify
It is a pleasure to run the ADModify tool through its paces. On this page we had a real challenge to change the GAL ‘Name’ display from: FirstName LastName to LastName, FirstName. I hope that on the journey you picked up other ideas for ADModify. My greatest joy would be if you ran ADModify again, but this time make different decisions.
If you like this page then please share it with your friends
See more Windows tools
•ADSI Edit Tool • Authoritative Restore • Windiff Compare Folders
• Eseutil Commands for Exchange 2010 Server •ESEutil •NTDSUtil