Configuring Remote Installation Service (RIS)
One curiosity of the RIS service is the way you configure the options via the Computer object in Active Directory Users and Computers. This page provides on tutorials explaining the Tabs, Menus and options for optimizing the RIS server in a Windows Server 2003 domain. (Good news, the Windows 2000 RIS configuration is almost identical.)
Introduction to Configuring RIS
Once you have installed RIS, there is still a great deal of menus to visit before the whole RIS system kicks into effective action. At the simple level, remember that by default, no clients will be given RIS images until you check the box on the Remote Install tab. At the complex level, decide how many RIS Servers you need and whether to install a referral server.
Topics for RIS Configuration Options
- Pre-Requisites and Assumptions – Before you Configure RIS
- Configuring RIS in Active Directory Users and Computers
- Remote Install Tab – RIS Interface
- Computer Account Generation Options
- Summary of Configuring RIS
‡
Pre-Requisites and Assumptions – Before you Configure RIS
I am assuming that you have successfully installed the RIS service (Not a trivial task, see here if you need help to install RIS). Most operations in this tutorial can be completed on any machine with Active Directory Users and Computers installed. However there are just a few limitations, such as Verify where you need to be logged on at the very RIS Server Console. (Naturally you have to be an administrator for the domain.)
Configuring RIS in Active Directory Users and Computers
Let us begin with an easy task:
- Open your MMC (Or select Administrative Tools)

- Launch Active Directory Users and Computers
- Select the computer object corresponding to the RIS Server
- right-click the RIS server and select properties
- Click on the Remote Install Tab
Remote Install Tab – RIS Interface
In passing, note that this where set the RIS server to respond to clients requests for XP images. Before the RIS service is ready for operation, we need to configure options.
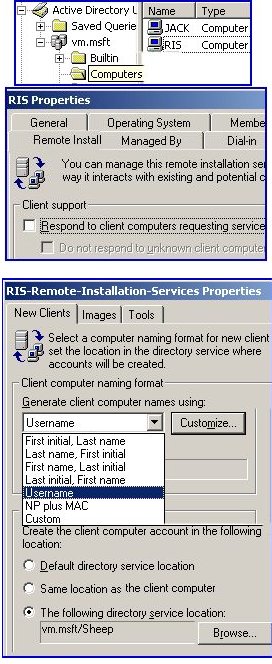
New Clients
From the Remote Install tab, click on the Advanced Option button. From the default tab called ‘New Clients’ see down at the bottom of the tab how you can control the container or OU where the new XP Machines will born. The Browse button connects through to Active Directory Users and Computers where you can make your choice of OU.
If you are at the console of the very RIS server, then the ‘Verify’ button is active. In particular check that the RIS and DHCP has been Authorized in Active Directory. Incidentally, for the ‘Dos diehards’ there is a command line program called Risetup, however all it does is invoke the same wizard that you activate through the Remote Install, Verify Button.
Images Tab
You can check how many versions of XP are available by inspecting the Images tab. It is also possible to add a ‘Vanilla’ versions of XP from this interface. The most likely reason for using this menu is if the original version became corrupted. See RiPrep for instructions how to add more flavors of XP Professional.
Tools Tab
I have never used the Tools menu. My understanding that this is for 3rd party vendors who hook onto RIS for their installation software.
Guy Recommends: A Free Trial of the Network Performance Monitor (NPM) v12
v12

SolarWinds’ Network Performance Monitor will help you discover what’s happening on your network. This utility will also guide you through troubleshooting; the dashboard will indicate whether the root cause is a broken link, faulty equipment or resource overload.
Perhaps the NPM’s best feature is the way it suggests solutions to network problems. Its second best feature is the ability to monitor the health of individual VMware virtual machines. If you are interested in troubleshooting, and creating network maps, then I recommend that you give this Network Performance Monitor a try.
Download your free trial of SolarWinds Network Performance Monitor.
Computer Account Generation Options

Decide How and Where to Place and What to Call the new XP Professional machines. With care you can control every aspect of the new XP Professionals from birth at the PXE card to death when you decommission in 2020.
The naming format is a triumph for %variables to generate the unique name of each and every machine. Take the time to investigate all the options, I guarantee it will give you ideas for naming conventions.
Summary of Configuring RIS
To me, Configuring RIS is a labor of love. A classic case of combining business with pleasure. As you visit all the menus described in the tutorial, you feel that you are doing a job that needs doing, while at the same time you learn a little more about RIS.
Much of the joy of configuring RIS is absorbing how RIS combines with Active Directory in a way that Ghost images could only dream of interacting.
If you like this page then please share it with your friends
More Windows Server 2003 topics:
• Windows RIS Server • RIS Home • RIS Install • RIS Overview
• Windows Services • RIS Configure • Windows 8 Hyper-V
Download my Windows Server 2003 Migration eBook only $5.25
![]() The extra features you get in your eBook include: new pages with more examples, detailed checklists, and recommendations for each stage. Go for Guy’s migration eBook – and get a printable version with copy enabled and no expiry date.
The extra features you get in your eBook include: new pages with more examples, detailed checklists, and recommendations for each stage. Go for Guy’s migration eBook – and get a printable version with copy enabled and no expiry date.