CSVDE Import – Advanced Features

Introduction to CSVDE Import – Advanced features

In order to master CSVDE import, there is a natural progression:

  1. Start with CSVDE in EXPORT mode, just to learn the LDAP properties.
  2. Try a simple CSVDE import example with just 3 user properties.
  3. Import more advanced user properties, by adding more LDAP columns in the spreadsheet.  This page is dedicated to these advanced LDAP features which you need for a bulk import.

Topics for CSVDE Import – Advanced Features

 ♦

Understanding LDAP Properties.

My theme is getting to know LDAP properties.  You should explore these three places before you truly appreciate what is possible with CSVDE in import mode.ADSI LDAP attributes for CSVDE

  • Active Directory Users and Computers – Properties sheets
  • ADSI Edit – Domain container, user’s attributes (see diagram)
  • CSVDE export mode – Open your spreadsheet and study row 1

Above all, you need a plan, a vision of the user you wish to script.  In particular, study the LDAP field names that correspond to the user property sheets, for example, the LDAP givenName is the equivalent of First Name on the users General Properties sheet.  By experimenting with Active Directory properties, ADSI attributes and CSVDE export, you will gather ideas for creating the perfect user!

Assumptions –  You have mastered the basic LDAP fields, dn, sAMAccountName, and objectClass.  You have successfully imported test users with CSVDE -i -f Newport.csv.  If not, then have a refresher with my Simple Import example.

My challenge is for you to write down all the LDAP attributes that you wish to fill with data.  Better still, copy the name from an export spreadsheet and then paste into the first row of the import spreadsheet.  Here are just a few ideas to get you thinking: department, displayName, description, phone, email, physicalDeliveryOfficeName.

Pure Excel Spreadsheet Techniques

Make life easy for yourself.  Take advantage of standard Excel functions and derive one field from another.

sAMAccountName – Build from givenName and SN

Consider the problem of the logon name, otherwise known as sAMAccountName.  This is the name that users type in the Ctrl Alt Delete logon box, it can take a maximum of 11 characters.  As a pencil and paper exercise, you could calculate this field from existing names.  A common formula is to take the first 4 letters of the firstname and add them to the first 3 letters of the surname (or similar combinations). For Peter Graham, you could derive a logon name of PeteGra.

Excel Spreadsheet derive LDAP fields sAMAccountname, DN

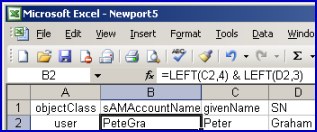
In Excel this Peter Graham example would translate to =left(c2,4) & left(d2,3).  Once perfected, you can copy down this formula so that all new users have a calculated sAMAccountName.  Note how the & (ampersand) joins the two elements.  A plus sign would not work, what you need is concatenation or in plain English, a join with an ampersand.

Left(text,number) is a built-in Excel function.  The first element refers to the text, I use a cell reference, and the second number is the number of characters that you want, three or four in my example.

DN (Distinguished Name)- Probably the most difficult LDAP field to create

Example of DN   CN=Guy Thomas,OU=Newport,dc=cp,dc=com.

Not only is DN important as is a mandatory field, but also DN has to be unique.  However, if you take it step-by-step it’s not as daunting as it first appears.  Extend the sAMAccountName method but include not one, but three elements.  Split the DN into CN (Common Name), OU (Organizational Unit) and dc (domain context).

1st Element CN=
Conceptually we need to script:  Guy Thomas  (or CN=Guy Thomas,)

Excel formula: ="CN="& c2 & " " & d2 &","

You could build the first element by joining all of the givenName with all of the SN.  For example, =c2 & " " & d2 result =Guy Thomas.  To be precise, you need to add cn= and a comma. For example, CN=Guy Thomas,.  So the Excel formula would be ="cn=" & c2 & " " & d2 & ",".  Often it’s the punctuation that catches you out, note how I included a space with a null string " ", also remember the comma at the end ",".

®

2nd Element OU=
If you remember, the second element is the OU.  The simplest solution is to ‘hard code’ with, & "OU=Newport,".  However if you have a production file where accounts will be in different OUs you could store the OU name in little used LDAP field such as extensionAttribute12.  In which case the formula becomes & "OU=" & x2 & ",".  Where x2 is the cell holding the OU name.  The advantage is where you copy one row, the following rows will have the correct OUs.  If you use the hard code method, all users will have the same OU.

3rd Element dc=
The final element has one or more dc=, elements.  People often take their eye of the ball when the copy dc=, this partly because amateurs think dc= means domain controller, professionals know it means domain context.  Therefore, do pay attention to the detail of your domain name.  The key question does your domain have a .com or .net extension?  Mistaking YourDom for YourDom.com would cause the import to fail.

As a matter of scripting technique, I store this value in one cell, say z2.  then I script the absolute reference by adding dollar signs thus, & $x$2.  In that cell z2 would be "dc=cp,dc=com".  If you wished to keep is simple you could just add: & "dc=cp,dc=com".

Final formula: ="CN="& c2 & " " & d2 & "," & "OU=" & x2 & "," & $z$2
 or another example:
="CN="& c2 & " " & d2 & "," & "OU=Newport,dc=cp,dc=com"

userAccountControl – 514 / 512  This another optional LDAP attribute.  Trust me and initially set the value of this field to 514 for user accounts.  While you could try other values such as 512, you may find that your import fails. My strategy is to create disabled accounts (514), then enable them later with a VBScript (512). 
(See here for VBScript)
If you want to know more about userAccountControl values see here

Guy Recommends:  SolarWinds’ Free Bulk Import ToolFree Download Solarwinds Bulk Import Tool

Import users from a spreadsheet.  Just provide a list of the users with their fields in the top row, and save as .csv file.  Then launch this FREE utility and match your fields with AD’s attributes, click and import the users.

Optionally, you can provide the name of the OU where the new accounts will be born. Download your FREE bulk import tool.

If you need more comprehensive software, download a free trial of SAM (Server & Application Monitor)

The CSVDE -i -k Bulk Import Command

Experimenting with CSVDE reminds me of Edison inventing the light bulb.  Legend has it that Edison produced thousands of failure before he created a working bulb.  My test folder is usually littered with half a dozen spreadsheets in various stages of development.  A bulk import with CSVDE is unlikely to work perfectly first time, don’t be afraid to go back and try again.Excel LDAP CSVDE Save as Type

Tip, Warning:  When you save your file as a .csv, Excel destroys all those formula that you spent hours creating.  What can you do?   I advise is creating an additional .xls or xlt file as these formats preserve your valuable formulae.  Specifically, Save as type: Template or Excel Workbook.

Now that your Newportx.csv file contains those carefully crafted LDAP properties, it is time to import.  Open the CMD prompt, navigate to the folder where you saved your .csv file.

Type this command:  CSVDE -i -f Newport9.csv

I like to add the -k switch, this tells CSVDE to ignore errors and continue.  For example: CSVDE -i -k -f Newport9.csv.  As with so many of the csvde commands, -k is not case sensitive.  In case you are wondering, CSVDE is fairly relaxed about the order of commands.  csvde -k -f newport9.csv -i produces the same result.

To check your new users, launch Active Directory Users and Computers and examine the Newport Organizational Unit.  After each import, right-click the OU and select Refresh from the short cut menu.  Simply pressing F5 is not good enough.

Guy Recommends:  A Free Trial of the Network Performance Monitor (NPM)Review of Orion NPM v11.5 v11.5

SolarWinds’ Orion performance monitor will help you discover what’s happening on your network.  This utility will also guide you through troubleshooting; the dashboard will indicate whether the root cause is a broken link, faulty equipment or resource overload.

What I like best is the way NPM suggests solutions to network problems.  Its also has the ability to monitor the health of individual VMware virtual machines.  If you are interested in troubleshooting, and creating network maps, then I recommend that you try NPM now.

Download a free trial of Solarwinds’ Network Performance Monitor

Troubleshooting CSVDE Import

  • Check that your understand of the: DC=domain, DC=COM (LDAP attributes).
  • If your ADSI Edit says: DC=mydom, then change, dc=cp,dc=com to dc=mydom.
  • Check that you created the correct OU.  My OU is called Newport.
  • Take care with your Find and Replace.
  • Pay close attention to punctuation, particularly the comma.
  • Make sure that Excel is not open at the .csv you are trying to create.
  • Check out the Error Messages.
  • Experiment with different syntax.
  • Open and close the CMD command prompt.
  • Get Your Free CSV User Import tool.

Summary of CSVDE Import

CSVDE is an ideal program to bulk import users into Active Directory.  Take the time to produce a great spreadsheet with values for all the important properties, for example, givenName, physicalDeliveryOfficeName and displayName.  Creating the DN attribute is daunting, so build it up in stages.

See Also

If you like this page then please share it with your friends