Introduction to CSVDE Export
I realize that your ultimate goal is to bulk import accounts into Active Directory. However, there are good reasons to master CSVDE export before you grapple with the import data. For instance, export is safer and simpler than import. You get an added bonus with CSVDE export, you learn about the LDAP properties of the Active Directory accounts.
Topics for CSVDE Export
- Example 1: The Plain CSVDE -f Export Switch
- Example 2: Filter the Output with CSVDE -d
- Example 3a: Filter with the -r Switch
- Example 3b: Fine Tuning the CSVDE -r filter
- Example 4: Filter_the_columns with -l (lower_case_L)
- Example 5: Combining Two Switches -r and -l
- Example 6: Two Other Handy Switches -m and -n.
- CSVDE Export Summary
CSVDE Export Examples
Our aim on this page is to export objects out of Active Directory and into a .csv file. Fortunately, the default action with CSVDE is to export, so all you need is one switch and the filename. For example, CSVDE -f filename.csv. My point is with export, keep it simple, there is no -e switch. It’s only later when we explore CSVDE import that we require an extra switch (-i).
Example 1: The Plain CSVDE -f Export Switch
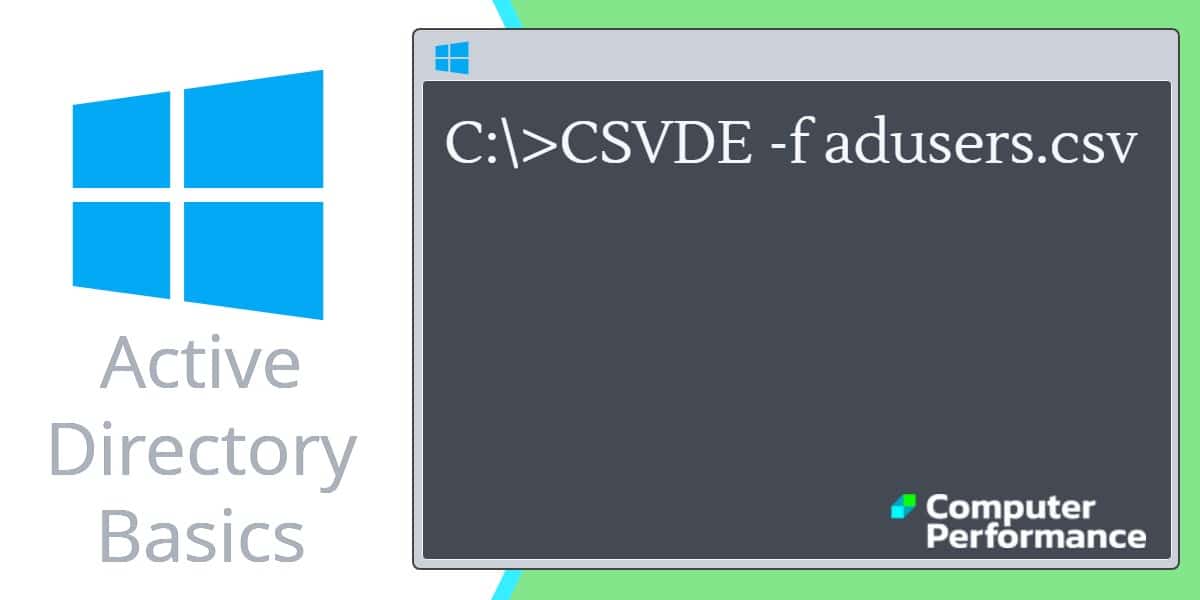
Our mission: To export all users and computers into a file called adusers.csv and then to read this export data in Excel.
Preparation: Open up a command prompt, I use![]() Start, Run, CMD.
Start, Run, CMD.
Type this command:
CSVDE -f adusers.csvTo see instantly the result of your command, type: notepad adusers.csv. For a more useful view of your export, open a spreadsheet like Excel, click File (menu) Open, select: Files of Type and change to All files, now browse to the directory where you created adusers.csv.
Learning Points
Note 1: The -f switch specifies the filename.
Guy Recommends: SolarWinds Admin Bundle for Active Directory (FREE TOOL)

Import users from a spreadsheet. Just provide a list of the users with their fields in the top row, and save as .csv file. Then launch this FREE utility and match your fields with AD’s attributes, click and import the users.
Optionally, you can provide the name of the OU where the new accounts will be born. Download your FREE bulk import tool.
If you need more comprehensive application analysis software, Download a free trial of SAM (Server & Application Monitor)
Example 2: Filter the Output with CSVDE -d
What the -d filter does is focus the export on one particular area. For example, suppose you only wish to export one OU and not the whole Active Directory domain.
Command:
CSVDE -d "OU=Newport,DC=cp,dc=com" -f Newport.csvIf you try this filter, make sure you substitute your OU for Newport and your domain for dc=cp. Observe carefully the syntax with those speech marks and commas between the elements. Avoid the trap of being so concerned with the -d switch that you forget the -f filename.csv.
Example 3a: Filter the Rows with CSVDE -r
If you use CSVDE with only the -f switch, then you probably get too much data. For instance, you may only be interested in the user objects and not the OU or binary objects. In which case you need a filter to remove the unwanted data.
There are two way to filter the output, row-wise or column-wise. With the -r switch you can select rows which meet your criteria, for example object = user.
Command:
CSVDE -f adusers.csv -r objectClass=userLearning Points
Note 1: Let us concentrate on the syntax of the filter switch: -r objectClass=User. There is no comma in this command, just a space between the switch and the parameter. What I mean is there should be no space between the minus sign and the switch. -r is correct. However, – r (with a space) would be a mistake.
Note 2: A Surprise. Even though you specifically ask for objectClass=user, CSVDE returns both user and computer objects. I didn’t know why this happened until Jon de R. kindly wrote in and said we need the objectCategory=person filter.
Jon de R. suggests: CSVDE -f onlyusers.csv -r objectCategory=person.
Clive B points out:objectCategory=person also includes ‘contacts’.
Warning: Sometimes when you copy and paste these CSVDE commands they do not work. What happens is that ‘copy’ picks up a phantom � symbol, which blocks the proper execution. All you get is a list of the commands, just as if you had typed CSVDE /? My answer was to check in Word for any extra symbols. If all else fails, I type the command manually at the command prompt.
Sometimes closing the CMD prompt window, then re-opening magically clears the problem. When you start a second CMD prompt, CSVDE suddenly works, whereas previously it failed. I only solved my latest mystery error by logging off and logging on again. I say again if CSVDE fails or encounters an error it seems to freeze when you subsequently issue a perfectly valid command.
Guy Recommends: Network Performance Monitor (FREE TRIAL)
SolarWinds Network Performance Monitor (NPM) will help you discover what’s happening on your network. This utility will also guide you through troubleshooting; the dashboard will indicate whether the root cause is a broken link, faulty equipment or resource overload.
What I like best is the way NPM suggests solutions to network problems. Its also has the ability to monitor the health of individual VMware virtual machines. If you are interested in troubleshooting, and creating network maps, then I recommend that you try NPM on a 30-day free trial.
Example 3b Fine Tuning the CSVDE -r Filter
Conclusion: after hours of frustration, my advice is to avoid these advanced features. While it is possible to refine the -r switch, my advice is stick to the basics of Example 2a.
O.K., so really want to master this -r switch. If you add brackets, speech marks and & (ampersand) then you can produce a more focused output. In my humble opinion, the normally excellent help is a bit sketchy on this -r switch. I found experimenting yielded results whereas slavishly following the instruction lead to disappointment.
Here is a command that filters users whose surname = Thomas.
CSVDE -f export.csv -r "(&(objectClass=user)(sn=Thomas))"Here is a variation using a wild card *
CSVDE -f export.csv -r "(&(objectClass=user)(sn=Thom*))"Note: Suggestion from Vinnie
I though you might find it useful that this command string only produced, users and no contacts.
CSVDE -f onlyusers.csv -r “(&(objectClass=user)(objectCategory=person))”
Learning Points
Note 1: I could not get this extended command to work without speech marks.
Note 2: Elsewhere, I have seen claims that instead of & (ampersand), you can use the word ‘and’. For me, it only worked with &.
Example 4: Filter the Columns with -l (lower case L)
There are many instances when you are only interested in a handful of the LDAP fields. In those cases you can filter the .CSV file column-wise by adding CSVDE -l. CSVDE is not case sensitive, so to save confusion you may prefer to use the upper case L rather than the lower case l.
When you wish to remove unnecessary columns, first research the correct LDAP names, for instance, there is no LDAP property called firstname or lastname, what you need instead is givenName and sn. The benefit of CSVDE export is that you can check the correct spelling by examining the first row of the .csv file.
Our mission: To remove unnecessary columns, or to put it another way, to select only 5 LDAP fields in the spreadsheet.
Command:
CSVDE -f export3.csv -l "DN, objectclass, objectcategory, givenName, sn"Learning Points
Note 1: The -l or -L switch requires commas between each LDAP field.
Note 2: I could not get this extended command to work without speech marks. Brackets were of no help, and omitting the ” ” resulted in an error.
Note 3: It is not essential to start with DN (distinguished name). As with so many CSVDE commands, the sequence of switches in not important.
Example 5: Combining Two Switches -r and -l
There is no reason why you should not get the best of both worlds and filter row-wise and column-wise. Make a straightforward join paying attention to the quotes and commas, or lack of commas.
Command:
CSVDE -f export4.csv -r objectClass=user -l "DN, objectclass, givenName, sn, name"Example 6: Two Other Handy Switches -m and -n.
Here is a pair of handy switches that I use when exporting are: -m ignores objects I do not need like objectSID. Also, try the -n switch, which means do not export binary values. Naturally, you would not need the -m or -n if you are filtering with -r.
Now you have gained experience, and grown in confidence, you are ready to try a CSVDE import.
Tip: Export CSVDE Tip – Create a .cmd File
Kindly Sent by Jonathan Sargeant
It struck me there must be a much simpler way of entering the complex filter criteria than the hit and miss copy and paste.
I first tried specifying the search criteria to be pulled in from a text file, but csvde doesn’t like the < command e.g. the following still resulted in everything in my AD being exported:
CSVDE -f students.csv < students.txtWhere students.txt contained the line: -d “OU=Students,DC=hmc,DC=ox,DC=ac,DC=uk”
So I thought, why not just put the whole lot into a text file, but save it as a .cmd file e.g.
CSVDE -f students.csv -d "OU=Students,DC=hmc,DC=ox,DC=ac,DC=uk"And call it thus c:\studnets.cmd
Editing the command file allows me to tinker with the queries and I have a much shorter string to type in at the prompt. I hope this is a useful suggestion.
CSVDE Export Summary
Start with CSVDE in export mode. The command is short and sweet, CSVDE -f filename.csv. Once you master the basics, then you get a more focused output if you add filters. If you want to reduce the data with a row-wise filter add -r. Else if you wish to choose particular LDAP fields, then the command is -L. Perhaps the most useful filter of them all is the -d to specify an OU.
See Also
- CSVDE Switches
- CSVDE Import Examples
- CSVDE Import Advanced
- CSVDE Home
- Troubleshooting CSVDE Errors
- Free CSVDE Export Tool
- CSVDE Secrets
- LDAP Fields