Introduction to Recipient Policies in Exchange Server 2003
Recipient Policies control how Exchange displays secondary email addresses. When you need additional SMTP addresses for your users, go to the Recipient Policies folder on the server and create a new policy. Recipient polices are stored separately, and behave differently, from the other types of Microsoft Group Policy.
Topics for Recipient Policies in Exchange Server 2003
- Purpose of a Recipient Policy in Exchange 2003
- Creating Recipient Policies
- Filtering with LDAP Queries
- Troubleshooting Recipient Policies
- E-Mail Address Policy Exchange 2010
- Summary Recipient Policy
♠
Purpose of a Recipient Policy in Exchange 2003
Exchange Server 2003 gives every mailbox-enabled user a default SMTP email address in the format: logonName @ ourdom.com. The point of a Recipient Policy is to tell Exchange 2003 how to define extra email addresses for users or groups. Take as an example, a company with a main email address of ourdom.com. Suppose that this company bought a second company called planBcomp.net. Wouldn’t it be useful if the planBcomp.net people could receive email addressed to accounts in both domains? No problem, use Exchange 2003 to create a Recipient Policy which adds a secondary SMTP address to their email settings.
Creating a Recipient Policy

Recipient Policies are decidedly tricky to configure. The two secrets are, make sure you have a filter, and remember to right-click, then ‘Apply this policy now’.
Creating the Recipient Policy is the easy part. Just navigate to the Recipient Policies folder, right-click then select: New. Once the new policy arrives, select the E-mail Addresses tab, click New and then SMTP address. Example @ourdom.com
Consider an email address: [email protected]. Here is an example of the logic that Exchange 2003 uses to define the left part of the email address. Exchange takes a user account alias, guyt in our example, the recipient policy then calculates the left side of the @, e.g. guyt@. and adds it to the domain name ourdom.com.
As I mentioned earlier, Exchange set the left part of the email address = logonName. So you may wish to change this format with one or more of these clever variables. For example, to build the displayName from the first 3 letters of the firstname added to the first 4 letters of the last name. The secret of custom SMTP addresses is to control this family of % variables:
%g = givenName.
%s = sn (Last name).
%4s = means first four letters of sn.
%d = displayname.
%m = Exchange alias.
Example: %3g.%[email protected] translates to = [email protected]
Where can you see these actual email addresses? Open Active Directory Users and Computers, select the user, properties tab and the Exchange e-mail tab.
Guy Recommends: SolarWinds’ Free Bulk Mailbox Import Tool

Import users from a spreadsheet, complete with their mailbox. Just provide a list of the users with the fields in the top row, and save as .csv file. Then launch this FREE utility, match your Exchange fields with AD’s attributes, click and import the users. Optionally, you can provide the name of the OU where the new mailboxes will be born.
There are also two bonus tools in the free download, and all 3 have been approved by Microsoft:
- Bulk-import new users and mailboxes into Active Directory.
- Seek and zap unwanted user accounts.
- Find inactive computers.
Download your FREE bulk mailbox import tool.
Filtering with LDAP Queries
First, let me introduce you to LDAP queries. Recipient Policies are one of the objects where Windows Active Directory and Exchange 2003 employ LDAP control the output. Another example would be Query-based distribution groups. The simplest example is the way in which ‘Find’ in Active Directory Users and Computers produces a list of filtered objects.
Let us return to our configuring the secondary address @planBcomp.net. Your strategy is either to edit the default recipient policy, in which case all users get the secondary SMTP address, or to create a new Recipient Policy and filter for a group of users. Usually, you would only want a sub-set of all users to have the secondary email address, for example, only those whose department = PlanB gets @planbcomp.net. Naturally, this filtering is controlled by the LDAP query.
When your tactics require a filter, then navigate to the Recipient Policy, General Tab, select the types of object you wish to apply the policy. Incidentally, the default (mailnickname=*) means everyone. To create a filter either let the wizard do it all for you, or else seek the custom query option and write in your own LDAP query.
![]() Remember to right-click your Recipient Policy and select
Remember to right-click your Recipient Policy and select
‘ Apply this policy now..’
Troubleshooting Recipient Policies
If your Windows Exchange 2003 recipient policy works first time, then you are a genius. However, if at first nothing seems to happen, here are tips to help you resolve the problem.
Note 1: If no email addresses seem to be created, then navigate to the Recipient Policies folder, right-click and Apply this policy now.. (See Diagram)
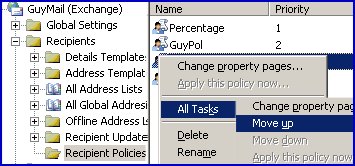 Note 2: Did you notice how the ‘Apply this policy now… is ‘ greyed out ‘ in the diagram? Hmmm.. what could be the reason? The answer is that Guy did not choose any settings for the filter. So, do not make this mistake, go back to your policies and select the Filter button, next click Add. Did you see an LDAP query appear in the window? Then great, your recipient policy has every chance of working – provided that you click on Apply this policy now.
Naturally, if you are even a minor expert in LDAP, then you can fine-tune the policy so that only a sub-set of users receive the policy, for example all users in the PlanB department.
Note 3: Once RUS finds a match with the LDAP query for a user, then it does not look at any of the other policies further down the list. Beware there is no policy merging, so plan your tactics accordingly.
E.g. If a user matches the criteria for Policy 1) then RUS does not look at Policy 2). So in the example below, the problem is that users do NOT receive PlanBdomain as a secondary address.
Original Sequence
Policy 1) %[email protected]
Policy 2) %[email protected] and %g@PlanBdomain
Policy 3) %s@somewherelse
Solution: Move Policy 2) Priority above Policy 1). See Move Up in the diagram above. The result of promoting Policy 2) is that all those who are in department = PlanB now get Policy 2). If you are wondering about the rest of the users who do not match Policy 2), they will all match Policy 1) so all just receive the one email address.
Modified Sequence
Policy 2) %[email protected] and %g@PlanBdomain
Policy 1) %[email protected]
Policy 3) %s@somewherelse
Trap: Another variation of this problem is that users receive the secondary address but no primary email address. An example of this variation is Policy 3), where only one email address is configured instead of two. To experience this problem, Policy 3) would have to be moved up to the top of the list.
Guy Recommends: SolarWinds Free Wake-On-LAN Utility

Encouraging computers to sleep when they’re not in use is a great idea – until you are away from your desk and need a file on that remote sleeping machine!
WOL also has business uses for example, rousing machines so that they can have update patches applied. My real reason for recommending you download this free tool is because it’s so much fun sending those ‘Magic Packets’. Give WOL a try – it’s free.
Download your free copy of SolarWinds Wake-On-LAN
Summary for Recipient Policy
Time spent creating Exchange Sever 2003’s Recipient Policy will repay with interest. When your users need a secondary email address, then launch the Exchange System Manager to navigate to the Recipient Policy container. Remember to filter your policy, and when you have finished be sure to click on : Apply policy now.
If you like this page then please share it with your friends