How to Install Remote Installation Service (RIS)
Roll out your desktops the modern RIS way. Choose Windows Server 2003’s RIS rather than Ghost. This page will show you how to install and configure Microsoft’s RIS. My goal is to help you design and plan a small or medium sized roll-out of XP Professional using RIS.
Introduction to RIS
There are many ways to install XP clients. Whilst ‘Ghost’ imaging software is popular, I urge you to try RIS. Take advantage of Microsoft’s intellimirror technology which automatically repairs client installations. RIS links with OUs and Group Policies as a result you can control the XP desktop from the outset.
Topics for Installing RIS
- Pre-requisites and Dependencies
- Phase 1 – Add or Remove Programs
- Phase 2 – Wizard to Copy the XP Image
- Phase 3 – Active Directory Users and Computers
- Summary of Installing RIS
‡
How to Install RIS (Remote Installation Service)
Pre-requisites and Dependencies
The RIS Server can be a Member Server, in fact it’s probably BETTER to offer RIS from a Member Server than a Domain Controller.
DHCP for the initial PXE (means Pre eXEecution, but is pronounced ‘Pixie) boot. Remember to Authorize the Server in Active Directory.
Active Directory (DNS). A simple practicality, you need a domain controller available when you install RIS.
Another 2GB NTFS partition. There will be a problem if you only have one partition, because the RIS images cannot be on the System Partition. The answer is to create a large partition for all the XP images.
Once a RIS failed to install on a server with a DHCP address and with the wrong DNS server. From a troubleshooting point of view, I foolishly changed both factors at once, so I was never sure whether it was the dynamic IP or the incorrect DNS that caused the problem.
Detailed Step-by-Step RIS Setup

Phase 1 – Add or Remove Programs
Think of installing the actual RIS Service as a two stage process. Begin just as you install WINS or Certificate or any other service. Navigate to Add or Remove Programs, Windows Components, select Remote Installation Services.
Unlike any another service that I know, there is more work to do after the Add or Remove programs session completes. After you reboot the Windows 2003 Server, seek out the Administrative Tools menu, and Remote Installation Services Setup. The RIS wizard is one of Microsoft’s best; it guides you through selecting the partition, and the name for the first XP Professional image.
Note: The above method works for Windows Server 2003, but on Windows 2000, return to the Add or Remove programs and see the newly added item, which leads you through to phase 2. Beware this is a truly bizarre experience and many give up at this point.
Phase 2 – Wizard to Copy the XP Image
It sounds silly now, but the first time the RIS wizard prompted me for the CD, I put in the Windows Server 2003 CD. Wrong. I should have put the XP Professional CD in the caddy, clearly the wizard wants to create the client image. (It did not need any server files.) It takes a fair time to copy the image into your NTFS partition. Here is a screen shot taken at the copying stage.
Phase 3 – Active Directory Users and Computers
Another surprise, most of the rest of your RIS configuration is at the Computer object in Active Directory Users and Computers (ADUC). However, if you think about what’s going to happen, it makes sense to configure RIS in Active Directory.
In the ADUC interface, navigate to the Computers container, or the Domain Controllers if you installed RIS on a DC. The initial surprise is that the Computer Object of the machine where you just installed RIS has extra Tab called, Remote Install. See diagram below.
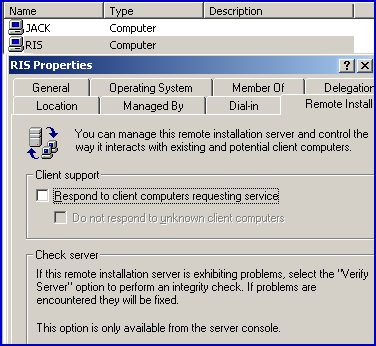
Note that the Respond to client computers requesting service is not checked by default. As an aside, my view is that finding this check box is your passing out test. Officially, the reason its unchecked is that Microsoft don’t want rogue laptops picking up images before you are ready.
Guy Recommends: A Free Trial of the Network Performance Monitor (NPM) v12
v12

SolarWinds’ Network Performance Monitor will help you discover what’s happening on your network. This utility will also guide you through troubleshooting; the dashboard will indicate whether the root cause is a broken link, faulty equipment or resource overload.
Perhaps the NPM’s best feature is the way it suggests solutions to network problems. Its second best feature is the ability to monitor the health of individual VMware virtual machines. If you are interested in troubleshooting, and creating network maps, then I recommend that you give this Network Performance Monitor a try.
Download your free trial of SolarWinds Network Performance Monitor.
What Next?
So, you have successfully installed the Service, What next?
- Authorize RIS / DHCP
- More Configuration at the Remote Install Tab. Including checking Respond to client computers requesting service.
- Collect more RIS Images
- Get ready at the client to install the actual XP Professional Client using RIS
Summary of Installing RIS
RIS is one of the most difficult Services to installing RIS. Let us be realistic, either you need a detailed plan, or you will need at least 3 attempts if you follow your nose and employ trial and error.
Download my Windows Server 2003 Migration eBook only $5.25
![]() The extra features you get in your eBook include: new pages with more examples, detailed checklists, and recommendations for each stage. Go for Guy’s migration eBook – and get a printable version with copy enabled and no expiry date.
The extra features you get in your eBook include: new pages with more examples, detailed checklists, and recommendations for each stage. Go for Guy’s migration eBook – and get a printable version with copy enabled and no expiry date.
If you like this page then please share it with your friends
More Windows Server 2003 topics:
• Windows RIS Server • RIS Home • RIS Install • RIS Overview