How to Install Windows Server 2008 

Plan your Windows Server 2008 install in two phases. Think of the first phase as a simple, plain install of a Microsoft member server. Think of the second phase as tuning that member server for a specific role, for example, Domain Controller, Terminal Server or a File and Print server.
Topics for How to Install Windows Server 2008
- Install Phase One
- Install Phase Two
- Three tasks in the ICT manager
- Troubleshooting Windows Server 2008 Installation
- How to Install Windows Server 8
♦
Installation of Windows Server 2008 Phase One
Microsoft products have their weaknesses, but installation is not one of them. If you have installed Vista, then phase one of installing Windows Server 2008 will be very similar, no text mode, all done via a GUI. All that you need is the Product Key, genuine of course, and a plan to either leave the default language as English US, or change the keyboard layout to English UK, French, German or some other language.
Which of the 5 editions is right for you?
- Standard
- Enterprise
- DataCenter
- Web
- Itanium
On surprise is that that the Standard, Enterprise, and DataCenter editions all are included on the same DVD. The version that is installed depends on the installation key that you use during the installation process. However there is a separate DVD for 32-bit and 64-bit versions of Windows Server 2008. Please note that 64-bit version is an absolute requirement for Exchange 2007. Also be aware the 64-bit requires digitally signed drivers.
Requirements
Minimum Recommend Optimal
Processor: 1 Ghz 2 Ghz 3 Ghz
RAM Mem: 512 Gb 2 Gb Depends on the edition
Disk Space: 8 Gb 40 Gb 80 Gb
Also common sense actions, disable UPS, remove any anti-virus software, realize once get the GUI, the firewall is active by default.
Installation of Windows Server 2008 Phase Two
The secret of installation phase two is to embrace the wizards, welcome the ICT (Initial Configuration Tasks) console and savour the organizational benefit of the Server Manager. Once you realise that these tools are to help you become an efficient, knowledgeable Windows Server 2008 administrator, then the installation battle of phase two is won. Sit back and imagine that you are a general. Now command your troops in the ICT console and the Server Manager to configure the new 2008 server to your wishes.
First Logon
Note this simple, but vital task at first logon – remember YOUR Administrator’s password. You get the chance to set the Administrator password at first logon, if you have lots of passwords, you need a secure, but foolproof method of remembering this crucial password. There is nothing more embarrassing than spending a morning configuring the server, only return after lunch to find that the screen kicked in, locked your server and you have forgotten the password. I only ever made this mistake once!
Guy Recommends: A Free Trial of the Network Performance Monitor (NPM) v12
v12

SolarWinds’ Network Performance Monitor will help you discover what’s happening on your network. This utility will also guide you through troubleshooting; the dashboard will indicate whether the root cause is a broken link, faulty equipment or resource overload.
Perhaps the NPM’s best feature is the way it suggests solutions to network problems. Its second best feature is the ability to monitor the health of individual VMware virtual machines. If you are interested in troubleshooting, and creating network maps, then I recommend that you give this Network Performance Monitor a try.
Download your free trial of SolarWinds Network Performance Monitor.
Three tasks in the ICT manager:
You can trace the evolution of the ICT (Initial Configuration Tasks) manager from Windows Server 2000’s: ‘Manage your server’ and Server 2003 RC2’s: ‘Post-Setup Security Updates’. The difference is that now we really need to refer to the ICT and abandon our old habit of ticking, ‘Don’t display this page at logon’ and forgetting about this useful GUI. Here are 3 important tasks for the ICT manager:
- Provide Computer Information
- Update This Server
- Configure This Server
1. Provide Computer Information
All that’s new is the timing of when you add this information about your server. Previously you typed these settings into dialog boxes during the initial installation process. This was inefficient because you were distracted by the newness of the installation, frustrated by the lack of network connection, or bored by waiting for file copy operations.
With Server 2008 you provide the computer information all at one time, if you make a mistake it’s easy to correct, plus if you ever have to change a setting you remember which interface you need.
If necessary call for help. Can you use long computer names? No. Help tells you that the pure computer name is still limited by 15 characters (63 bytes).
Configure Network Settings
Note how this is a shortcut to Control Panel –> Network Settings
Provide computer name and domain
Joining a domain employs the same method as all operating systems from NT4 to XP. However, good news, it worked first time, faultlessly and without any of the ‘work-arounds’ commonly needed by older systems.
[Please wait for the user profile service]
Guy Recommends : SolarWinds’ Free VM Monitor

The best feature of this new this new version of SolarWinds VM Monitor is that it checks Windows Hyper-V. Naturally, it still works with virtual machines on VMware ESX Servers. VM Monitor is a clever desktop tool that not only tests that your server is online, but also displays the CPU and memory utilization for each node.
It’s easy to install and to configure this virtual machine monitor, all you need the host server’s IP address or hostname and the logon info. Give this virtual machine monitor a try – it’s free.
Download your free copy of SolarWinds VM Monitor.
2. Update This Server
Every administrator moans about at least one of these three settings, Guy says stop complaining and just configure the settings to your liking – including turning off the service if you don’t like it. As for me, I turn them all on at least to some degree.
- Windows Automatic Updating
- Windows Error Reporting
- Customer Experience Improvement Program
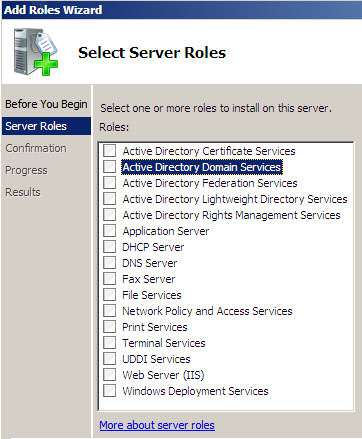
3. Configure this Server
Add Roles Wizard
Select Server Roles such as:
- Active Directory Domain Services (Domain Controller)
- DNS Server
- DHCP Server
Alternatively:
- Application Server
- File Services
- Print Services
Maybe
- Terminal Services
- Network Policy and Access Services
Remember to re-visit the Server Manager at regular intervals so that you can configure additional roles or add new features.
Troubleshooting Windows Server 2008 Installation
- Disconnect the UPS
- Run the Windows memory diagnostic tool
- Get updated mass storage drivers
- In Phase Two – disable the firewall to connect to other servers
- Disable Virus Protection (If you are upgrading)
- If all else fails, check ‘Help and Support’ on the first menu of the Windows Server 2008 setup.
If you like this page then please share it with your friends
Microsoft Windows Server 2008 Topics:
• Server 2008 Home • Overview • What’s New? • Migration Advice • Install • SP1 Review
• AD DC • Roles • Features • Editions • Hyper-V • UAC • IPv6 • Group Policy • Free NPM Trial