Introduction to the Secrets of CSVDE
The purpose of this page is to reveal my secrets for importing user accounts into Active Directory with CSVDE. As with many secrets, once you know them, you think, ‘That was blindingly obvious, why didn’t I realize it before.’
Guy’s Secrets of CSVDE
- Discovering the LDAP Attributes
- Researching LDAP with ADSI Edit
- Unleashing the Spreadsheet Functions
- Choosing the Best CSVDE Switches
- CSVDE is Case Insensitive
- Why Begin with CSVDE Export?
♦
Discovering the LDAP Attributes
For the best CSVDE import, you need to know the LDAP equivalent of common Active Directory names. The secret of learning the names of LDAP attributes is to compare what you see in Active Directory Users and Computers with the the equivalent in ADSI Edit. A variation of this technique is to match a value in the Excel export with the same value on the Active Directory properties sheet.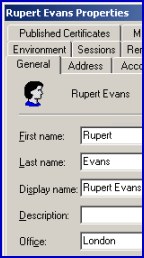
Never miss an opportunity to learn about LDAP. What you learn here about user properties, you can apply to Exchange. I will explain in this section how to discover LDAP names. For example, suppose you are puzzled because there seems to be no LDAP name corresponding to Office on the user’s General properties sheet. Guy’s method is to launch Active Directory Users and Computer, open a user’s property sheet, select the attribute that you are interested in and enter a value in the box. See Office: London in the diagram opposite.
CSVDE now plays a small, but important role in discovering the LDAP attributes, to export Active Directory, go to the command prompt and type: CSVDE -f Newport7.csv.
Now it’s over to Excel:
- Open Newport7.csv and employ the power of Find to discover the whereabouts of the value ‘London’.
- Cross-reference the LDAP name by looking for the corresponding first row of the column where you found ‘London’. In this example, the answer is physicalDeliveryOfficeName.
- To summarise, you have matched London to physicalDeliveryOfficeName and also matched London to Office in the Active Directory General properties sheet (see above).
- In conclusion if you want to populate the Office field, copy physicalDeliveryOfficeName and paste into the first row of the import spreadsheet.

Researching LDAP with ADSI Edit
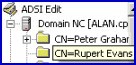
ADSI Edit provides a method of matching the LDAP attributes in your spreadsheet with the property sheets Active Directory Users and computers. The concept is remarkably simple, and similar to the spreadsheet technique I described earlier. Add a value in the property sheet and trace that value with ADSI Edit. When you find the value you can match it to the correct LDAP attribute and so know what to add to your spreadsheet.
Begin by extracting ADSI Edit from the support tools on the Windows Server CD. When you launch ADSI Edit, select the Domain Naming Context. Scroll down until you find the OU and user that you are researching. right-click, properties and now you should all the available attributes. See more about ADSI Edit here.
If you master ADSI Edit here in importing user accounts, you can then apply this technique to other aspects of Active Directory troubleshooting. For example if TechNet suggests finding and altering the tombstoneLifetime to enable a very old backup to restore.
Guy Recommends: SolarWinds’ Free Bulk Import Tool

Import users from a spreadsheet. Just provide a list of the users with their fields in the top row, and save as .csv file. Then launch this FREE utility and match your fields with AD’s attributes, click and import the users.
Optionally, you can provide the name of the OU where the new accounts will be born. Download your FREE bulk import tool.
If you need more comprehensive software, download a free trial of SAM (Server & Application Monitor)
Unleashing Spreadsheet Functions
Concentrate on spreadsheet functions such as left, and & (ampersand). The secret of a bulk import is a great spreadsheet. The difference between a good import and a great import is not what you put in the csvde commands, but what you put in the -f filename.csv itself.
Use Excel to create not only .csv files, but also to store your formula in .xls or xlt files. The horror story is that when you Save as a .csv file, the formulae are crystallized into values. Whilst that .csv file is great for import, it is useless if you wish to amend the previous formula. However, if you cunningly kept the formula in separate Excel Workbook, then you can try another experiment with similar formula. In addition, when you add new users to the WorkBook.xls those users will benefit from you lovely formulae.
Here is a example that neatly illustrates the relative importance of the CSVDE commands and the spreadsheet. My number one request about CSVDE is how do you specify which OU will hold the new users? The answer of course lies in the DN and you control the DN in the spreadsheet, not by way of a CSVDE switch.
An example showing how to create Guy Thomas in the Newport OU.
DN "CN=Guy Thomas,OU=newport,dc=cp,dc=com"
Choosing the best CSVDE Switches
When you first export accounts from Active Directory there is a tendency to get swamped with data. To get a more focused supply of data, it is better to master the filter switches -d, -r and -l (Lower case L), than just using the -m and -n parameters.
For CSVDE import, naturally, you need the -i. Surprisingly there is no -e for export, just remember that export is so simple all you need is CSVDE -f filename. The only extra switch I use is with import is the -k which tells CSVDE to ignore simple errors. See here for more information on switches.
CSVDE is Case inSensitive
CSVDE is not case sensitive, therefore, when you are troubleshooting, upper or lower case is not the cause of your problem. The only confusion arises if you are reading notes on the L and I switches (i and l). Beware, lower case l can be mistaken for upper case I.
There is no need to worry about the order of switches or parameters as Microsoft calls them.
CSVDE -f Newport6.csv -i -k. works as well as CSVDE -i -f Newport6.csv -k.
Another trap is adding spaces. The minus sign should be adjacent to the switch with no space in between, -f is correct, but CSVDE would not recognise – f as the filename switch.
-d is one of my favourite filters, but be warned you must not add spaces between the elements. -d "OU=Newport,dc=cp,dc=com" Resist the temptation to add spaces to make the command clearer. This will not work: -d "OU=Newport, dc=cp, dc=com".
Guy Recommends: Permissions Analyzer – Free Active Directory Tool
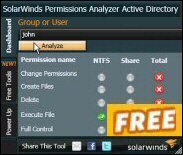
I like thePermissions Monitor because it enables me to see quickly WHO has permissions to do WHAT. When you launch this tool it analyzes a users effective NTFS permissions for a specific file or folder, takes into account network share access, then displays the results in a nifty desktop dashboard!
Think of all the frustration that this free utility saves when you are troubleshooting authorization problems for users access to a resource. Give this permissions monitor a try – it’s free!
Download Permissions Analyser – Free Active Directory Tool
Why Begin with CSVDE Export?
Begin with CSVDE export. Not only will this teach you about LDAP, but you will do no harm to Active Directory while you become familiar with CSVDE. If you begin your learning at CSVDE export mode, it really will save you frustration. I realise that you goal is likely to be to bulk import, but it will not take long to try a few export experiments; add a couple of filters and you will soon know all there is to know about this side of CSVDE. Moreover, you can apply the Excel skills to your CSVDE import.
If you like this page then please share it with your friends