How to Configure an Exchange 2010 SMTP Connector
The golden rule with Exchange 2010 SMTP connectors is don’t do more than you have to. You probably need internet access, therefore by all means configure an SMTP connector to your ISP. However, if you have multiple Exchange 2010 servers in the same site then they can communicate effectively without SMTP connectors.
One surprise is that Exchange 2010 SMTP connectors are uni-directional, thus to link two servers, you need one connector to receive and another to send email.
Topics for Configuring Exchange 2010 SMTP Connectors
- Exchange 2010 Routing Strategies
- How to Configure an Exchange 2010 SMTP Connector
- How to Configure Internet Email in Exchange 2010 Server
- Send Connectors – Designing Outbound Message Flow
- Receive Connectors – Designing Inbound Message Flow
- PowerShell RecieveConnector Cmdlets (Exchange Management Shell)
- Telnet for Troubleshooting
♠
Exchange 2010 Routing Strategies
Routing Strategies For Local Email
Emails addressed to recipients in the local Active Directory site are handled by the Hub Transport server. It’s the job of the categorizer to deliver the email to the correct mailbox server; whereupon the message is retrieved by a version of Outlook.
Routing Strategies For Remote Email
- Internal to Hub Transport –> Hub Transport different Active Directory site.
- Internal to Hub Transport server –> ISP Internet
- Internal to Hub Transport server –> Edge –> Internet
Receiving email uses the same routes as above, but in reverse. Thus it follows that you can categorize messages into four groups: inbound or outbound, and local or remote.
Because every delivery strategy involves the Hub Transport server, you can appreciate why every Exchange 2010 organization needs at least one server with this role. Indeed, Microsoft’s recommendation is to have one server with the Hub Transport role in each Active Directory site.
Supporting Components for the Exchange 2010 SMTP Connectors
While the categorizer is at the heart of the message system, let us get to know the other important components, the Microsoft Exchange Mail Submission service, store driver and the submission queue.
- As soon as an Outlook users sends an email, the Microsoft Exchange Mail Submission service takes over.
- The Submission service then notifies a Hub Transport server in the local Active Directory site.
- The email is then sent to the for the categorizer’s submission queue.
- The store driver uses MAPI to connects to a user’s ‘Outbox’ folder, it then retrieves the message from the corresponding Mailbox server.
- Then the store driver converts the MAPI format into the Summary-Transport Neutral Encapsulation Format (S/TNEF). This format has no plain text part, and is in eight-bit binary format.
- Next, the store driver places the email into the submission queue and moves the message from the user’s ‘Outbox’ to their ‘Sent Items’ folder.
Message Delivery
In addition to local delivery, email can also enter the submission queue from an SMTP Receive connector, or even from the Pickup directory. The submission queue stores all messages safely on disk until the categorizer is ready to process them.
It is the categorizer that is responsible for calculating the best routing path, for converting content format, and applying any organizational message policies. Incidentally, the categorizer on an Edge Transport server verifies the recipient’s SMTP address of an inbound message before it places it in the delivery queue.
The incoming message is then routed to a Hub Transport server. In a new development in Exchange 2010, the categorizer makes copies of messages that have multiple recipients.
The categorizer processes each message in the submission queue in turn. If a message is intended for a Mailbox server in the same Active Directory site, the categorizer places the message in a local delivery queue. The store driver then takes over and delivers the message to the Mailbox server role by using MAPI.
Guy Recommends: A Free Trial of the Network Performance Monitor (NPM) v11.5
v11.5
SolarWinds’ Network Performance Monitor will help you discover what’s happening on your network. This utility will also guide you through troubleshooting; the dashboard will indicate whether the root cause is a broken link, faulty equipment or resource overload.
What I like best is the way NPM suggests solutions to network problems. Its also has the ability to monitor the health of individual VMware virtual machines. If you are interested in troubleshooting, and creating network maps, then I recommend that you try NPM now.
Download a free trial of SolarWinds’ Network Performance Monitor
How to Configure an Exchange 2010 SMTP Connector
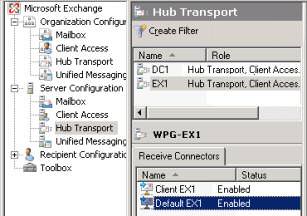
The logical place to create an SMTP connector is on the server(s) with the Hub Transport role. The other place to configure these Exchange 2010 send and receive connectors would be on the Edge Server.
- Launch the Exchange Management Console.
- Check the Organizational Configuration node.
- Observe the Hub Transport node.
- Check the Server Configuration.
- Click on this second Hub Transport node.
- This is where you create or edit the Send and Receive Connectors.
Receive Connectors
Receive connectors represent a gateway through which all inbound messages are enter your Exchange 2010 Server. You need a receive connectors for each server, and they control how that server takes delivery of messages from the Internet or email clients.
Luckily, the receive connectors required for internal mail flow are automatically created when you install the Hub or Edge Transport server role.
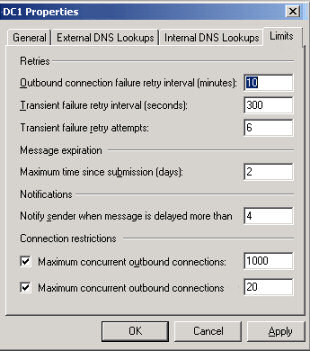
Once you create a Receive Connector you can tweak its Properties. Suppose you have a partner company, you can specify the source IP addresses from where you receive messages. Also, in the Limits tab you can adjust the maximum size of messages and configure permissions. And for troubleshooting messages, you could enable protocol logging on the General tab of Exchange 2010 SMTP connector.
PowerShell RecieveConnector Cmdlets (Exchange Management Shell)
As an alternative to configuring through the Exchange Management Console, is to use PowerShell to manage the Exchange 2010 SMTP connectors.
Get-ReceiveConnector -Server YourExch
Note 1: You need to change the value for ‘-Server YourExch’
Note 2: This is how you could research more of these cmdlets:
Get-command *ReceiveConnector
This reveals the ReceiveConnector family of Powershell Cmdlets
- Get-ReceiveConnector
- Set-ReceiveConnector
- New-ReceiveConnector
- Remove-ReceiveConnector
New-ReceiveConnector -Name ‘Receive from ISP’ `
-Type FromInternet `
-Bindings 0.0.0.0:25 -RemoteIPRanges 0.0.0.0- 255.255.255.255
or
New-ReceiveConnector -Name ‘Receive from Central’ `
-Type FromEnterprise -Bindings 0.0.0.0:25 `
-RemoteIPRanges 10.10.0.0(255.255.0.0) `
-RelayControl Open
How to Configure Internet Email in Exchange 2010 Server
In Exchange 2003, all internet mail is directed through the SMTP virtual server. However in Exchange 2010 server, the SMTP virtual server no longer handles internet email, instead this task is performed by the new SMTP connector.
Internet emails are typically routed by the Hub Transport via an Edge server subscription. Alternatively, you could create a Send connector on the Hub Transport server itself, and configure it to deliver outgoing internet email.
- Launch the Exchange Management Console.
- Expand the Organizational Configuration node.
- Select the Hub Transport node.
- Click on the Send Connectors.
- In the Actions pane, select New Send Connector.
- The Wizard will guide you through the options. In particular look for the Internet option from the drop down box.
- Choose a Smart Host, or DNS MX records to send the email.
PowerShell SendConnector
Alternatively you can use the New-SendConnector cmdlet in the Exchange Management Shell. Note, as you create the new Send Connector, observe the PowerShell code on the last screen, just before the wizard completes.
Guy Recommends: SolarWinds Network Topology Mapper (NTM)

NTM will produce a neat diagram of your network topology. But that’s just the start;Network Topology Mapper can create an inventory of the hardware and software of your machines and network devices. Other neat features include dynamic update for when you add new devices to your network. I also love the ability to export the diagrams to Microsoft Visio.
Finally, Guy bets that if you test drive the Network Topology Mapper then you will find a device on your network that you had forgotten about, or someone else installed without you realizing!
Download your 14 day free trial ofSolarWinds Network Topology Mapper
Exchange 2003 Features not supported in Exchange 2010
Enabled/disabled property
Exchange Server 2003 cannot detect the status of an Exchange Server 2010 connector, therefore it will continue routing, even if a connector is disabled.
Maximum message size
If you have two connectors, one from Exchange 2003 and another from 2010, then make sure that the message size limits are the same. If not, then the lower value will be the restriction that is in force.
Other Restrictions not enforced
In addition, these settings are not supported in Exchange 2010: Message priority, Message type, and Per user delivery restriction.
Firewall Rules – Suggestions
External
- Allow port 25 to and from all external IP addresses to the Edge Transport server. (Since this is the default port required for SMTP email delivery.)
- Open port 53 to all external IP addresses from the Edge Transport server. You need this port for the Edge server to resolve DNS names on the Internet.
Internal
- Again, port 25 is the default port for SMTP. Allow this port to and from the Edge Transport server to specified Hub Transport servers.
- Allow port 50636 for LDAPS (Secure Lightweight Directory Access Protocol) from specified Hub Transport servers to the Edge Transport server. This port is used specifically for the Edge Synchronization process.
SolarWinds Firewall Browser 

Here is an utility where you can review firewall settings such as access control lists (ACL), or troubleshoot problems with network address translation (NAT).
Other reasons to download this SolarWinds Firewall Browser include managing requests to change your firewall settings, and testing firewall rules before you go live.
Guy recommends that you download a copy of the SolarWinds free Firewall Browser.
Exchange 2010 Send Connectors – Designing Outbound Message Flow
Send connectors create a logical connection to remote email systems and are responsible for outbound transmissions. When you use the EdgeSync process, it will configure the Send connectors automatically. Alternatively, you can create the Send Connectors manually with either the EMC or the Shell.
When designing outbound message flow in Exchange 2010, consider the following factors:
Will you use a single location for routing all messages to the Internet? Or will you enable message routing through multiple locations? If your organization has more than one location with an Internet connection, you can enable message routing through each. To do this, you can either:
- Install an Edge Transport server in each location and configure edge subscriptions between the Edge Transport servers and the local Active Directory sites.
- Manually configure Send connectors on the Hub Transport or Edge Transport servers.
On the one hand, the advantage of a single route is security. You need be concerned only with a single connection, from the internal network to the Internet. On the other hand, multiple routes provide redundancy and load balancing.
Internal Send Connectors
You probably won’t need to create internal Send connectors, because they are created automatically when you add the Hub Transport role.
Partner This type of connector is used to forward messages to partner domains. Partner connectors allow connections only to SMTP servers that authenticate using TLS certificates.
Custom Send Connector
The time to establish extra Send connectors is when you want to create direct routes rather than using the internet. With this type of Send connector, you specify the address space and the smart host. Keep in mind that if you create another Send connector, that connector can be used by any Hub Transport server in your organization. This is because all configuration data is stored in Active Directory.
Receive Connectors – Designing Inbound Message Flow
In addition to the security v redundancy factors, which apply email in both directions, inbound message flow has extra challenges. Firstly remember that receive connectors just affect the local server, whereas send connectors affect the entire Exchange organization.
The key point with a receive connector is that it must contain a unique combination of: IP address bindings, port-number assignments, and the remote IP address ranges. One reason of creating extra receive connectors is that particular sources require authentication.
How are you are going to plan for MX record with multiple inbound routing points? If you configure MX records with different priorities, then the SMTP servers with the lowest priority MX record references are contacted first for all inbound messages. MX records with higher priorities are only referenced when the first SMTP server is not available.
 Guy Recommends: The SolarWinds Exchange Monitor
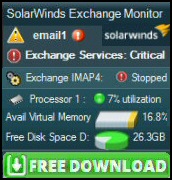
Here is a free tool to monitor your Exchange Server. Download and install the utility, then inspect your mail queues, monitor the Exchange server’s memory, confirm there is enough disk space, and check the CPU utilization.
This is the real deal – there is no catch. SolarWinds provides this fully-functioning freebie, as part of their commitment to supporting the network management community.
Free Download of SolarWinds Exchange Monitor
Using Telnet to Test Exchange 2010 SMTP Connections
In Windows Server 2008, the Telnet Client is disabled by default. Therefore you need to enable it by:
- Open Server Manager.
- Click Action, and then select Add Features.
- Select Telnet Client, and then click Next.
- Click Install, and then click Close
Using Telnet in Exchange Server 2010
Telnet is a marvellous command for basic SMTP troubleshooting. There are two tricks to using telnet in this situation:
1) type: Set LocalEcho
2) Remember to specify port 25, because Telnet normally uses TCP port 23.
Launch a cmd or PowerShell session
Type:
Telnet
set localecho
Open server port for example:
Open exchserver 25
or
Open mail.YourVille.com 25
Hopefully you get a reply such as:
Reply
220 EXCHSERVER.YourVille.com Microsoft ESMTP MAIL Service ready at Wed, 30 March 2011
Type: Quit. This will exit Telnet.
More Info Testing SMTP with Telnet
®