Ezine 123 – Windiff – A most underused utilityThe main purpose of this ezine is to give you a free copy of my ‘Tweaking the Registry’ ebook. Naturally the ebook focuses on regedit, however there are also general learning points and techniques, for example: Windiff can compare any two files, not just two .reg files. Vista Registry and Windiff Windiff is Microsoft’s most underused utility. When it comes to exploring the registry, Windiff really is a hidden treasure. Time and time again, the situation arises where you change a computer setting, and then you want to know where in the registry that setting is to be found. If your ultimate goal is to create a .reg file, start by researching the values with Windiff. Windiff is the forgotten utility, not only amongst users, but also amongst Microsoft’s development team. Microsoft has made no changes to Windiff since NT 4.0 days, it still has the same clunky interface. To be fair, perhaps they have taken the view that you cannot improve on perfection, Windiff does a superb job of comparing files, and highlighting the differences. Topics for WindiffThe master plan to discover a particular registry setting is deceptively simple:
Export the registry to a file, then change the setting using a GUI. Now export the registry again, and compare the before and after files in Windiff. With perseverance, you will isolate the place in the registry which held the GUI setting. Here are detailed instructions for mastering Windiff: - Export ‘All’ the registry; please remember where you saved this file.
(The reason I say ALL is to be sure that you include the setting under investigation.) - Use the normal GUI to make a change to the desktop, a menu, or any Vista feature that interests you.
- Export ‘All’ the registry – again, naturally save to a different file.
- Compare the two exported files using Windiff.
- Identify the registry area of interest. Find the values and data corresponding to your change. Be prepared to ignore non-significant areas of the files, for example, time stamps.
- Open the exported file in notepad. Cross reference your Windiff findings with the detail in notepad.
- If possible, create a .reg file with just the one setting to prove that you truly have found the correct area of the registry. Research how to create your .reg file.
Guy’s Tactics The practical challenges are overcoming Windiff’s quirks, and also sharpening your registry research skills. What I often do is a preliminary experiment to identify potential areas in the registry, then I repeat the experiment but export only a ‘Branch’ rather than the whole registry. For example, for the first run through of Windiff choose to export ‘All’ the registry, but for the second run, export only the ‘Branch’ HKEY_LOCAL_MACHINE. Stay flexible, decide whether to keep ploughing through Windiff looking for the crucial difference, or be ruthless, launch regedit and try another Export, Change, Export sequence. I also call for the assistance of Notepad, both to examine the registry entries and to create .reg files. Ultimate success is creating two .reg files, one turn the setting on, the other to turn it off Guy Recommends: A Free Trial of the Network Performance Monitor (NPM) v11.5 v11.5SolarWinds’ Orion performance monitor will help you discover what’s happening on your network. This utility will also guide you through troubleshooting; the dashboard will indicate whether the root cause is a broken link, faulty equipment or resource overload. What I like best is the way NPM suggests solutions to network problems. Its also has the ability to monitor the health of individual VMware virtual machines. If you are interested in troubleshooting, and creating network maps, then I recommend that you try NPM now. Download a free trial of Solarwinds’ Network Performance Monitor Before you start experimenting with the registry, there are three Windiff quirks that you should know about: 1) Files v Directories
Windiff compares directories as well as files. Make sure that you focus on: Compare Files… See screenshot showing the Vista File menu. 2) First File.. Second File – The Knack
Now for the most difficult knack of using Windiff. In order to make its comparison, Windiff asks you for two files – fair enough. Intellectually, this twin request is obvious, however, when it comes to the practical task it is not clear when Windiff is asking you for the first file……and when it is prompting you for the second file. Fortunately, once you are alert to the potential problem, and read the screen, then there is no problem – just The Knack.  
To be frank, the very first time I used Windiff it all seemed a blur. I thought that there was something wrong with the program, it seemed to be asking for the same file twice rather than two discreet files. When I ran Windiff for the second, and subsequent times, I realized that the initial confusion was my fault. Read the above screenshots to see what I mean. 3) Show Identical Lines
If you allow Windiff to show all lines, including those lines where there is no difference, then you will get swamped with data. Thus I recommend going to Windiff’s Options menu, and removing the tick next to ‘Show Identical Lines’. What this does is filter the files, as a result you can concentrate on the interesting parts, the differences. While I have identified three quirks, it’s well worth exploring the settings underneath the other Windiff menus. In a nutshell, the problem is that the Recycle bin mysteriously disappears from Vista’s desktop. While I discovered how to recover the bin through the Desktop –> Personalize menu, my real goal was to find the setting in the registry. I wanted to find the value which controls ‘show / hide’ for the Recycle bin. Clearly this is a job for Windiff, incidentally, you can see the full background story on Vista’s Recycle Bin here. Windiff Method- As a preliminary step, make sure that the Recycle Bin is displayed.
(Desktop right-click –>Personalize). - Export ‘All’ the registry, file = DisplayBefore.reg.
- Delete the Recycle Bin from the desktop.
- Export ‘All’ the registry (again), file = DisplayAfter.reg.
- Launch Windiff, load the First File = DisplayBefore.reg. Then load the Second File = DisplayAfter.reg.
- To compare the differences, filter the entries by navigating to:
Options (Menu) remove the tick next to Show Identical Lines.
Windiff ResultsAs anticipated, exporting ‘All’ the registry produced a huge file with lots of possible entries that could be controlling the Recycle Bin. Once I filtered Windiff’s entries, the most significant value was: {645FF040-5081-101B-9F08-00AA002F954E}. Repeat the Windiff experiment, but export only the HKEY_CURRENT_USER Registry Branch File before = UserBinYes.reg, file after = UserNoBin.reg, see screenshot below. This second experiment produced less data, thus it was easier to track down the critical value. Once again, {645FF040-5081-101B-9F08-00AA002F954E}, turned out to be the crucial registry entry. Additional research revealed that this is indeed the CLSID for the Recycle Bin. Also, a difference of dword:00000000 and dword:00000001 made sense, since zero and one corresponding to: off / on or, hide / show. 
My next experiment was to open the exported registry file in notepad. Then I truncated the file to include just the settings below: (Note the first two lines are needed by all .reg files; namely the reference to the registry editor, followed by a blank line.) Windows Registry Editor Version 5.00[HKEY_CURRENT_USER\Software\Microsoft\Windows\CurrentVersion\Explorer\HideDesktopIcons\ClassicStartMenu]
"{645FF040-5081-101B-9F08-00AA002F954E}"=dword:00000000 [HKEY_CURRENT_USER\Software\Microsoft\Windows\CurrentVersion\Explorer\HideDesktopIcons\NewStartPanel]
"{645FF040-5081-101B-9F08-00AA002F954E}"=dword:00000000
I also created a file with the ‘opposite’ setting: dword:00000001 instead of dword:00000000. Windows Registry Editor Version 5.00[HKEY_CURRENT_USER\Software\Microsoft\Windows\CurrentVersion\Explorer\HideDesktopIcons\ClassicStartMenu]
"{645FF040-5081-101B-9F08-00AA002F954E}"=dword:00000001 [HKEY_CURRENT_USER\Software\Microsoft\Windows\CurrentVersion\Explorer\HideDesktopIcons\NewStartPanel]
"{645FF040-5081-101B-9F08-00AA002F954E}"=dword:00000001
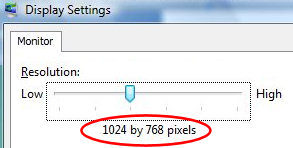
If you save each of these two snippets into a .reg file, then you can employ the pair of them to toggle displaying the Recycle Bin on the desktop. Just remember after you apply the .reg file, then press F5 to refresh the desktop. Guy Recommends: Tools4ever’s UMRA Tired of writing scripts? The User Management Resource Administrator solution by Tools4ever offers an alternative to time-consuming manual processes. It features 100% auto provisioning, Helpdesk Delegation, Connectors to more than 130 systems/applications, Workflow Management, Self Service and many other benefits. Click on the link for more information onUMRA. The fine details of this problem are not important in our quest to understand how Windiff works. What this case illustrates is the classic technique of how to employ Windiff, and thus discover a registry setting. My actual problem was that when my Vista laptop went into sleep mode, the display resolution kept changing. Before sleep the resolution was 1280 by 800, but when Vista awakened, the display mysteriously moved down a resolution of 1024 by 768. This was irritating because the icons and text were distorted, and consequently, the menus were not so easy to read.  
Windiff Experiment- Export the whole registry, file = DisplayBefore.reg.
- Change the display settings from 1280 by 800 to 1024 by 768.
- Export the whole registry (again), file = DisplayAfter.reg.
- Launch Windiff, load the First File = DisplayBefore. Then load the Second File = DisplayAfter.reg.
- Compare the differences. Chose Options (Menu) remove the tick next to Show Identical Lines.
Windiff Registry Comparison  - Note that you can see the filenames in the grey bar near the top of the screenshot.
.\displayafter.reg:.\displaybefore.reg. - Double click on the top line, then wait a minute or so for Windiff to make the file comparisons.
- Make sure that you check the options menu: Show Identical Lines is NOT selected.
- Scroll down, but ignore hex data and ignore date values; what you are looking for is display resolution settings. For example, here is an interesting difference:
DefaultSettings.YResolution="DWORD:00000300"
DefaultSettings.YResolution="DWORD:00000320" (See screenshot). - Background research reveals that Hex 300 = Decimal 768. While Hex 320 is Decimal 800. Where have we seen 768 and 800 before? Why in the display settings that we are investigating.
- It looks like we have found the crucial registry value DWORD DefaultSettings.YResolution.
Notepad comparisonWindiff highlights (literally) "DefaultSettings.YResolution"=DWORD:00000320 If you search through the DisplayBefore.reg file with notepad, then you find several entries in under HKEY_LOCAL_MACHINE\SYSTEM\CurrentControlSet\Hardware Profiles\Current\System [HKEY_LOCAL_MACHINE\SYSTEM\CurrentControlSet\Hardware Profiles\Current\System\CurrentControlSet\Control\VIDEO]
"DefaultSettings.XResolution"=dword:00000500
"DefaultSettings.YResolution"=dword:00000320 Equivalent Settings 500 Hex = 1280 Decimal
320 Hex = 800 Decimal TrapWhen you are preparing the .reg file, the trap is to choose the wrong ControlSet. CurrentControlSet and ControlSet001 are usually one and the same. However, beware of configuring CurrentControlSet002, which is usually the Last Known Good, thus configuring ControlSet002 instead of ControlSet001 is likely to produce undesired effects. Tricks and Good PracticeDon’t be conned into thinking you have found the setting. Keep going through the 4 stage cycle until you can demonstrate with .reg file that you have found the correct value in the registry. 1) Export registry Branch
2) Change setting
3) Export registry Branch again
4) Compare the files with Windiff By highlighting the word Branch, I want to encourage you to keep refining the area of the registry that you are researching. If you are lucky, or skilful, then you get the correct Branch first time. On the other hand if you are lazy or con yourself, then you get the wrong Branch, and your .reg file will be useless. Summary of WindiffWindiff is a hidden gem for unearthing where to find a Vista desktop, or a menu setting in the registry. To master Windiff requires the painstaking approach of a research scientist. You also need to overcome Windiff’s quirks, and then trawl through dozens of lines containing registry differences. Believe that sooner or later, you will discover the registry value that corresponds to the GUI setting. Will and Guy HumorThis week Will and Guy have some funny, joke computing messages.
Lots of useful computer services• Solarwinds Orion NPM Review • How to Shut Down Win8 •Win8 Eventlog • Win8 FAQ • Ezines • E 167 WinDiff •E 131 BigInfo •E 123 WinDiff • E 102 SysPrep •E 69 Perfmon •E62 WinDiff • E 25 Event Trigger • E 24 CacheMov • E 18 Services •E 16 Perfmon • Exchange Monitor | 


