Windows 7 AutoPlay Enable | Disable Settings 

The Windows 7 AutoPlay helps you to select which program plays your music, or displays your photos. Sometimes AutoPlay seems to have a mind of it’s own, you can regain the upper hand by enabling or disabling the settings in the Control Panel.
Topics for Windows 7 AutoPlay Enable | Disable
- How to Configure Windows 7 AutoPlay from the Control Panel
- What Are AutoPlay and Autorun
- Troubleshooting AutoPlay Using Group Policy Editor
- Registry Values for NoDriveTypeAutoRun
- See More About NoDriveTypeAutorun in Vista
- Windows 8 AutoPlay
♦
How To Configure Windows 7 AutoPlay From the Control Panel
There is an individual AutoPlay enable / disable setting for every type of Windows 7 media or device. Here is where you configure the default settings for each media.
Click on the Windows 7 Start ‘Orb’, Control Panel, Hardware and Sound, AutoPlay.
Quick and Easy – Turn Off AutoPlay
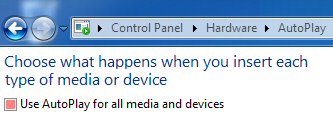
Take the tick out of ‘Use AutoPlay for all media and devices’.
More Subtle AutoPlay Configuration
Popular options to enable AutoPlay are:
Play xyz using ….
Take no action.
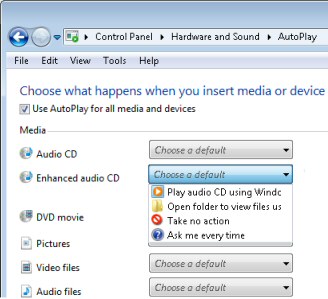
It is worth scrolling down the list in your Control Panel just to see the sheer scale of the media that you can enable or disable for AutoPlay. There are at least 4 options for each type of media. When you have finished you can either save, or else reset the defaults.
Note: The Windows 7 AutoPlay setting is in the Hardware and Sound folder, this is a slightly different location from XP.
Guy Recommends: A Free Trial of the Network Performance Monitor(NPM) v11.5
v11.5

SolarWinds’ Orion performance monitor will help you discover what’s happening on your network. This utility will also guide you through troubleshooting; the dashboard will indicate whether the root cause is a broken link, faulty equipment or resource overload.
What I like best is the way NPM suggests solutions to network problems. Its also has the ability to monitor the health of individual VMware virtual machines. If you are interested in troubleshooting, and creating network maps, then I recommend that you try NPM now.
Download a free trial of Solarwinds’ Network Performance Monitor
Troubleshooting AutoPlay Using Group Policy Editor
For times when changing the above AutoPlay settings has no effect, turn next to either gpedit.msc or regedit.
To open the Local Group Policy Editor click on the Start Orb, type: gpedit.msc (remember the .msc extension).
Navigate to:
Computer Configuration / Administrative Templates /
Windows Components / AutoPlay Policies
Edit: Turn off AutoPlay –> Disabled.
After that you can reset it to Not Configured, which is the default state.
Troubleshooting AutoPlay Using Regedit
Group Policy Editor is not supplied with Windows Home editions, however, you can use regedit to achieve the same result.
Open regedit and locate the following key:
HKEY_LOCAL_MACHINE\Software\Microsoft\Windows\CurrentVersion\Policies\Explorer
Change: NoDriveTypeAutorun to 0x91
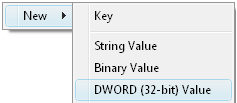
If necessary create this key as a DWORD.
What Are AutoPlay and Autorun
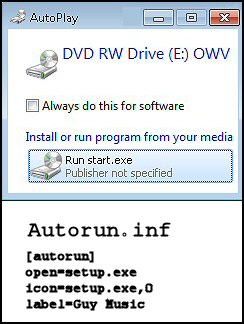
Autorun is special pre-cursor of AutoPlay for the CD-ROM drive. Let us start by considering the operating system’s reaction when you put a DVD in the caddy. Manufacturers include an autorun.inf file to specify their idea of what should autostart when you close the caddy.
Unlike other AutoPlay media, the CD-ROM has extra hardware considerations which are dealt with by Autorun. AutoPlay helps choose which application autorun should report to. In the case of a music CD, which program should take over from autorun and start playing the music. Alternatively, you can configure Autorun to do nothing.
Here is the registry setting to check, or to turn off Autorun:
HKEY_LOCAL_MACHINE\SYSTEM\CurrentControlSet\Services\cdrom
A value of 1 means enable autorun (on), while zero means disable autorun.
Note 1: Make sure that you are in the CurrentControlSet, not ControlSet001.
Note 2: There is also an autorun setting for the floppy disk.
HKEY_LOCAL_MACHINE\SYSTEM\CurrentControlSet\services\sfloppy
Note 3: Incidentally, the Shift key no longer overrides AutoPlay as it did in XP.
AutoPlay, MCN and CD-ROM
Media Change Notification (MCN) messages from the CD-ROM driver, trigger the AutoPlay behaviour of the CD / DVD. However, if we suppress these messages then the CD will not automatically start playing. You can disable AutoPlay by configuring the appropriate value of NoDriveTypeAutoRun or NoDriveAutoRun in the registry, this is an alternative to the Control Panel method described above.
The benefit of using NoDriveTypeAutoRun, rather than NoDriveAutoRun, is that you can select which drives you wish to disable. For example, you can allow only CD-ROM drives to run AutoPlay.
Monitor Your Network with the Real-time Traffic Analyzer

The main reason to monitor your network is to check that your all your servers are available. If there is a network problem you want an interface to show the scope of the problem at a glance.
Even when all servers and routers are available, sooner or later you will be curious to know who, or what, is hogging your precious network’s bandwidth. A GUI showing the top 10 users makes interesting reading.
Another reason to monitor network traffic is to learn more about your server’s response times and the use of resources. To take the pain out of capturing frames and analysing the raw data, Guy recommends that you download a copy of the SolarWindsfree Real-time NetFlow Analyzer.
Registry Values for NoDriveTypeAutoRun
Here below, is a table of the hex values to control AutoPlay on a variety of drives. The entries are a bitmapped value. To disable Windows 7 AutoPlay on a particular type of drive, set the bit representing that type of drive to 1. If you want to disable more than one type of drive, sum the hexadecimal values of the representative bits.
In Windows 7, the default value for NoDriveTypeAutoRun is 0x91 (145). You calculate the figure by summing: 0x1 (unknown types), 0x80 (unknown types) and 0x10 (network drives). In Vista the default is 0x95 (149), the extra 4 is accounted for by the disable floppy drive setting.
0x1 | Disables AutoPlay on drives of unknown type. |
0x4 | Disables AutoPlay on removable drives. |
0x8 | Disables AutoPlay on fixed drives. |
0x10 | Disables AutoPlay on network drives. |
0x20 | Disables AutoPlay on CD-ROM drives. |
0x40 | Disables AutoPlay on RAM drives. |
0x80 | Disables AutoPlay on drives of unknown type. |
0xFF | Disables AutoPlay on all types of drives. |
Registry Instructions for NoDriveTypeAutoRun
One feature of NoDriveTypeAutoRun in Windows 7 is that you set the value in the Current_User section of the registry.
- Type ‘regedit’ in the Start Search dialog box. (See more details on starting regedit)
- Navigate to this path:
HKEY_CURRENT_USER\Software\Microsoft\Windows\CurrentVersion\Policies\Explorer - If necessary create a dword called NoDriveTypeAutoRun

- Set NoDriveTypeAutoRun = 000000FF
- A value of 000000FF (decimal 255) would disable AutoRun on all drives.
- A better strategy is to the above table, and use a Hexadecimal calculator to compute the most suitable value for your machine.
- There is no need to logoff; the NoDriveTypeAutoRun setting should take effect straightaway.
Recommended: Solarwinds’ Permissions Analyzer – Free Active Directory Tool

I like the Permissions Monitor because it enables me to see WHO has permissions to do WHAT at a glance. When you launch this tool it analyzes a users effective NTFS permissions for a specific file or folder, and takes into account network share access, then displays the results in a nifty desktop dashboard!
Think of all the frustration that this free SolarWinds utility saves when you are troubleshooting authorization problems for user’s access to a resource. Give this permissions monitor a try – it’s free!
Download SolarWinds’ Free Permissions Analyser – Active Directory Tool
Key Learning Points
- Do you find the NoDriveTypeAutoRun value in HKCU** or HKLM?
Answer: HKCU! If there is a conflict then HKLM wins. - Should you add a value, or modify an existing setting?
Answer: In Windows 7 modify to a hex value = 000000FF. Consult the above table for greater precision.
Answer: In XP or W2K3 you may need to create a DWORD called: NoDriveTypeAutoRun. Then set it a hex value of 000000FF (Decimal 255) - Is NoDriveTypeAutoRun a String Value or a DWORD?
Answer: DWORD. - Do you need to Restart, or merely Log Off / On?
Answer: Neither, changes to AutoPlay should occur as soon as you enter the value in the registry. - Tip: Add this Value, NoDriveTypeAutoRun to Regedit’s Favorites menu
** HKLM is an abbreviation of HKEY_LOCAL_MACHINE, and HKCU is shorthand for HKEY_CURRENT_USER. These acronyms are so well-known that you can even use them in .reg files, Vista will understand and obey the registry instruction.
Make the CD-ROM Available Only to Users Who are Logged on Locally
Local Group Policy Editor Method
You can use GPEDIT.msc to restrict the CD-ROM access to locally logged-on user only. Once you launch Gpedit.msc, navigate to this section of the Local Group Policy Editor:
Computer Configuration, Windows Settings, Security Settings, Local Policies, Security Options,
Devices: Restrict CD-ROM access to locally logged-on user only. Enabled
Registry AllocateCDRoms Method
You could also achieve the same result by editing the registry directly:
- Type ‘regedit’ in the Start Search dialog box.
- Navigate to this path:
HKEY_LOCAL_MACHINE\SOFTWARE\Microsoft\Windows NT\CurrentVersion\Winlogon - Modify AllocateCDRoms, else create a Reg_SZ.
Set the value to 0. Meaning make available only to local users, and NOT those connecting across the network.
MSConfig
It’s always interesting to see which services and programs have hitched a ride on the operating system’s startup routine. I recommend that you click Start (orb) type ‘MSconfig’ in the Search dialog box and then check the ‘Services’ and ‘Startup’ tabs.
Summary of Windows 7 AutoPlay Enable | Disable
It’s well worth visiting the Control Panel, Hardware and Sounds, just to see the range of media that you can enable or disable for AutoPlay. The purpose of AutoPlay is to select which of your programs should play by default. For example, if you insert a music DVD, AutoPlay and Autorun work together to decide which of your programs should play the sound tracks. As with most Window 7 settings, there are additional registry keys to fine tune the behavior, which you can access via regedit or gpedit.msc.
If you like this page then please share it with your friends
More Windows 7 Registry Tweaks
- Gpedit – Local Group Policy Editor
- Editing the Windows 7 Registry with PowerShell
- PaintDesktopVersion (Build Number)
- Change the Name of a Windows 7 Computer
with LocalizedString - Hide User From Welcome Screen
- RegisteredOwner – Windows 7 Registry Hack
- NoDriveTypeAutoRun
- Delete Roaming Profile Cache
- Windows 7 .Reg Files Examples
- Performance Monitoring