Microsoft Exchange 2010 – Global Address List (GAL)

Don’t dabble with GAL settings. Either leave the configuration alone, and just let Outlook users see the Default Global Address List; or else, take the time to study, plan, and test before you implement custom Address Lists.
Topics for Exchange 2010 Global Address Lists
- What is the Exchange 2010 Global Address List?
- How to Find the Exchange 2010 GAL
- Updating A Global Address List in Exchange 2010
- PowerShell Commands to Manage GlobalAddressList
- Managing Address Lists
- What Happened to RUS in Exchange 2010?
- Exchange 2010 Email Address Policy
- Coexistence Exchange 2010 and Exchange 2003
- How to Find the Exchange 2010 Offline Address Book
♠
What is the Exchange 2010 Global Address List?
- A directory service for Outlook users to find email addresses and distribution lists.
- THE phone book for email.
- An inventory of all Exchange 2010 objects.
- The mother of custom Address Lists.
- Some people refer to the GAL as the Global Address Book (Rather than List).
How to Find the Exchange 2010 GAL
- Launch the Exchange Management Console.
- Expand the Organization Configuration (Key point).
- Select the Mailbox node.
- Click on the Address Lists tab.
- Observe the Default Global Address List
Default Address Lists (See Screenshot right)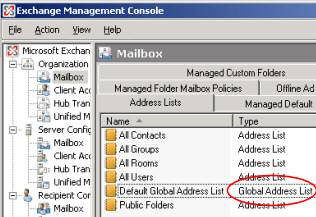
Once you realize that there are a handful of built-in Address Lists, you soon realize that you could create your own Custom Address Lists. However, be careful, don’t create too many lists, and furthermore, give thought to meaningful names for your lists.
- All Users
- All Groups
- All Contacts
- All Rooms
- Default Global Address Lists
- Public Folders
- (Custom Address Lists)
Updating a Global Address List in Exchange 2010
The situation, you want to modify the GAL, however, you discover that you cannot edit (or delete) the Default Global Address List. This is the master list of all the Exchange 2010 objects, and the operating system won’t let you mess with it. Fortunately, there is a well respected work-around, create a new Global Address List, and then ‘update’ the mailbox. This procedure has its own PowerShell command.
Guy Recommends: A Free Trial of the Network Performance Monitor (NPM) v11.5
v11.5
SolarWinds’ Network Performance Monitor will help you discover what’s happening on your network. This utility will also guide you through troubleshooting; the dashboard will indicate whether the root cause is a broken link, faulty equipment or resource overload.
What I like best is the way NPM suggests solutions to network problems. Its also has the ability to monitor the health of individual VMware virtual machines. If you are interested in troubleshooting, and creating network maps, then I recommend that you try NPM now.
Download a free trial of SolarWinds’ Network Performance Monitor
PowerShell Commands to Manage GlobalAddressList
As an alternative to clicking in the Exchange Management CONSOLE, you could type commands in the Exchange Management SHELL. Using cmdlets like those below will save you time, more so when you realize that every Exchange 2010 configuration task has a faster command-line equivalent. Furthermore, certain commands are ONLY available in the Shell, for example, new-GlobalAddressList.
As a learning progression, by all means start with GUI Exchange Management Console, but note as each Wizard completes so it shows you the corresponding PowerShell commands. Why not save these so that in future you can use the cmdlets in the Shell?
Research in the Exchange Management Shell with:
get-Command *GlobalAddressList
Five verbs for GlobalAddressList
get, new, remove, set, and update. For example:
get-help new-GlobalAddressList
Note 1: As usual, PowerShell uses a singular noun: GlobalAddressList
Note 2: There is another family of cmdlets without the word ‘Global’, their noun is plain ‘AddressList’.
Preliminary Step: Create a new Global Address List
Launch the Exchange Management SHELL and use this PowerShell cmdlet
New-GlobalAddressList -Name "Worcester" -IncludedRecipients MailboxUsers
Important: Firstly, you have to use PowerShell to create your new Global Address List (There is no equivelent command in the GUI). Secondly, once created, you can only edit it with the set-GlobalAddressList cmdlet.
Suggestion: Research the cmdlet new-GlobalAddressList, in particular the -conditional family of parameters. Try: get-help new-GlobalAddressList -full
Help with error message: ‘Access to address list service on all Exchange 2010 servers has been denied’ try the following.
a) Simply repeat the command! It worked for me, also maybe try a different name, I tried "Worcester2" the second time I ran the command.
b) Check the Services snap-in. Are all the Exchange services running, e.g. System Attendant?
c) Revert to the old trick of rebooting the server, maybe it has just received a ‘Patch’ or update.
Method: PowerShell – Exchange Management SHELL
The situation, you have created and defined a new Global Address List using the above cmdlet.
update-GlobalAddressList -Identity "Worcester"
Note 3: If you don’t get the required result either create a new Global Address List, else use set-GlobalAddressList to modify the one you created earlier.
Note 4: Real-life example from Brett
Here is syntax that I used after I deleted the old GAL manually using ADSI Edit.
new-GlobalAddressList -Name "Default Global Address List" -IncludedRecipients AllRecipients
update-GlobalAddressList -Identity "Default Global Address List"
 Guy Recommends: The SolarWinds Exchange Monitor
Here is a free tool to monitor your Exchange Server. Download and install the utility, then inspect your mail queues, monitor the Exchange server’s memory, confirm there is enough disk space, and check the CPU utilization.
This is the real deal – there is no catch. SolarWinds provides this fully-functioning freebie, as part of their commitment to supporting the network management community.
Free Download of SolarWinds Exchange Monitor
Managing Address Lists
Begin with a clear idea of what you want to achieve with a custom address list. Presumably, making it easier for Outlook users to find addresses ranks high on your agenda. If you are doing this task for real, as opposed to just learning about Exchange 2010 Address Lists, then involve at a cross-section of users before you design a complex, multi-levelled, address list scheme only to find that the end-users hate it.
Good news, behind the scenes Active Directory changes the members of the list dynamically based on LDAP queries.
Research in the Exchange Management Shell with:
get-Command *AddressList
Let me emphasise that these are simple Address Lists (There is no ‘Global’ word here).
Six verbs for AddressList
get, move, new, remove, set, and update. For example:
get-help update-AddressList
Note 1: There is another family of cmdlets without the word ‘Global’, their noun is plain AddressList.
Method 1: PowerShell and the Exchange Management SHELL
The situation, you have created, and defined a new Address List using the Exchange Management SHELL.
update-AddressList -Identity "Boston"
or
update-AddressList -Identity "All Users\Campus\Students"
Note 1: ‘Students’ is the name of the Address List. All Users\Campus is a sub-folder.
That’s it! This is why people use PowerShell instead of the GUI! To be fair, you need to run the cmdlet below to see the names of possible Address Lists. Again, to be fair, everyone takes a peek in the GUI the first time they configure an item; it’s for the repetitive tasks that PowerShell saves times.
get-AddressList
Method 2: Exchange Management CONSOLE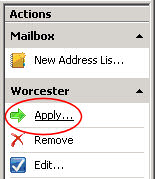
Here below is an alternative to PowerShell. Before you ‘Apply’ your Global Address List you may like to click on Edit, the benefit is that you can check, and if necessary, edit the settings.
- Launch the Exchange Management Console
- Expand the Organization Configuration node
- Select Mailbox.
- Click the Address List tab
- Select the particular Address List that you want.
- Click ‘Apply’ in the Actions pane. (Key point)
- The Apply Address List wizard should launch.
- On the Introduction page, complete the following fields:
- Apply the address list
Immediately (Best)
At the following time (If the server is busy).
Guy Recommends: SolarWinds Network Topology Mapper (NTM)

NTM will produce a neat diagram of your network topology. But that’s just the start;Network Topology Mapper can create an inventory of the hardware and software of your machines and network devices. Other neat features include dynamic update for when you add new devices to your network. I also love the ability to export the diagrams to Microsoft Visio.
Finally, Guy bets that if you test drive the Network Topology Mapper then you will find a device on your network that you had forgotten about, or someone else installed without you realizing!
Download your 14 day free trial ofSolarWinds Network Topology Mapper
What Happened to RUS in Exchange 2010?
Quite frankly, RUS was slow and cumbersome, so he won’t be missed now that his role has been incorporated into Exchange 2010.
Exchange 2003’s RUS (Recipient Update Service) has been replaced in Exchange 2010 by two PowerShell cmdlets, update-AddressList and update-EmailAddressPolicy.
Thus, don’t go looking for RUS in Exchange 2010, instead launch the Exchange Management Shell and experiment with ‘Address’ family of cmdlets.
Exchange 2010 Email Address Policy
Exchange 2010’s E-mail address policy generates email addresses for your users, contacts, and groups. This is important, for without an address nobody could send or receive emails. The killer reason to configure this setting is to adjust the way that email addresses display in the Exchange 2010 GAL. For example, small companies display email addresses as FirstName LastName, whereas large companies display prefer, Lastname, Firstname. It is small companies who are exapanding that need to change their Email Address Policy, this is how you can adjust the Exchange 2010 GAL settings.
Using the Exchange Management Console to Configure your E-Mail Address Policy
Stage One
- Launch the Exchange Management Console.
- Expand the Organization Configuration
- Select the Hub Transport node (Key point).
- Click on the Address Lists tab.
- Click E-Mail Address Policies tab.
- Select the e-mail address policy that you want to edit.
- In the Actions pane, click Edit.
Stage Two – Follow the Address Policy Wizard
- On the Introduction page, review the name.
- From the Conditions page, view or edit the following fields:
- Select the condition(s) Use this section to set one or more conditions for your e-mail address policy. If you do not want to set any conditions for the policy, do not select any of the check boxes.
- On the E-Mail Addresses page, select the e-mail address, and then click Edit.
- You can now change the way email addresses display in the GAL,
First name.last name.
or Last name.first name.
(and many other formats).
PowerShell Commands to Manage EmailAddressPolicy
Research in the Exchange Management Shell with:
get-Command *EmailAddressPolicy
Five verbs for EmailAddressPolicy
get, new, remove, set, and update
Note 1: Singular EmailAddressPolicy
®